Shutter speed is a fundamental aspect of photography that plays a crucial role in capturing stunning images. As a photographer, understanding how shutter speed works and its impact on your photos is essential for achieving the desired results. In this comprehensive guide, we will delve into the intricacies of shutter speed and provide you with a valuable resource – a shutter speed chart – to help you make informed decisions in various shooting situations.
Table of Contents
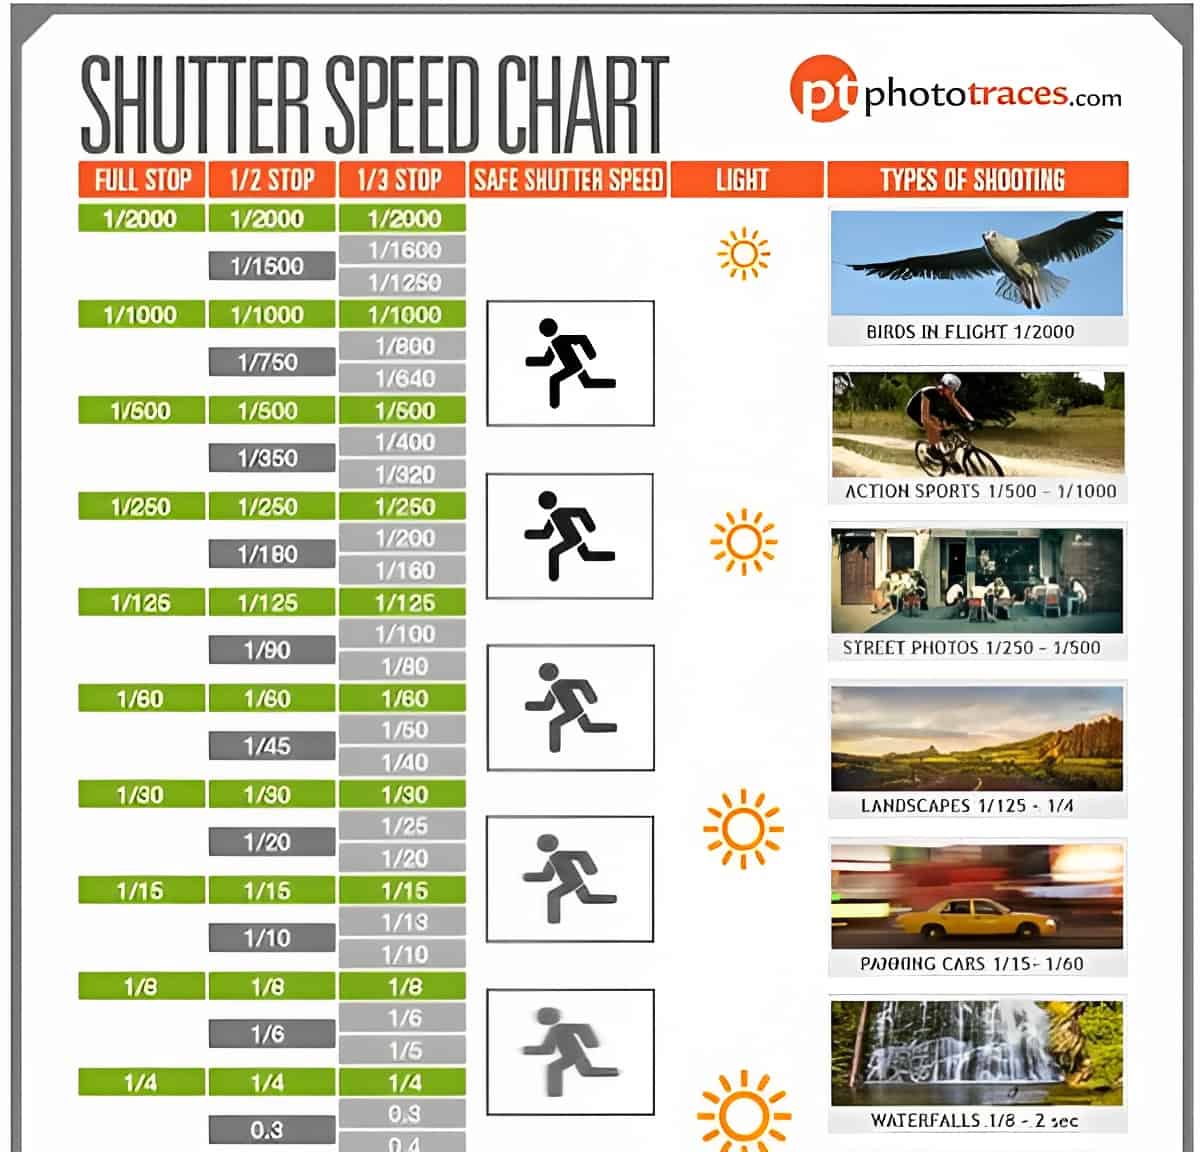
Shutter Speed Charts
Purpose of the Shutter Speed Chart

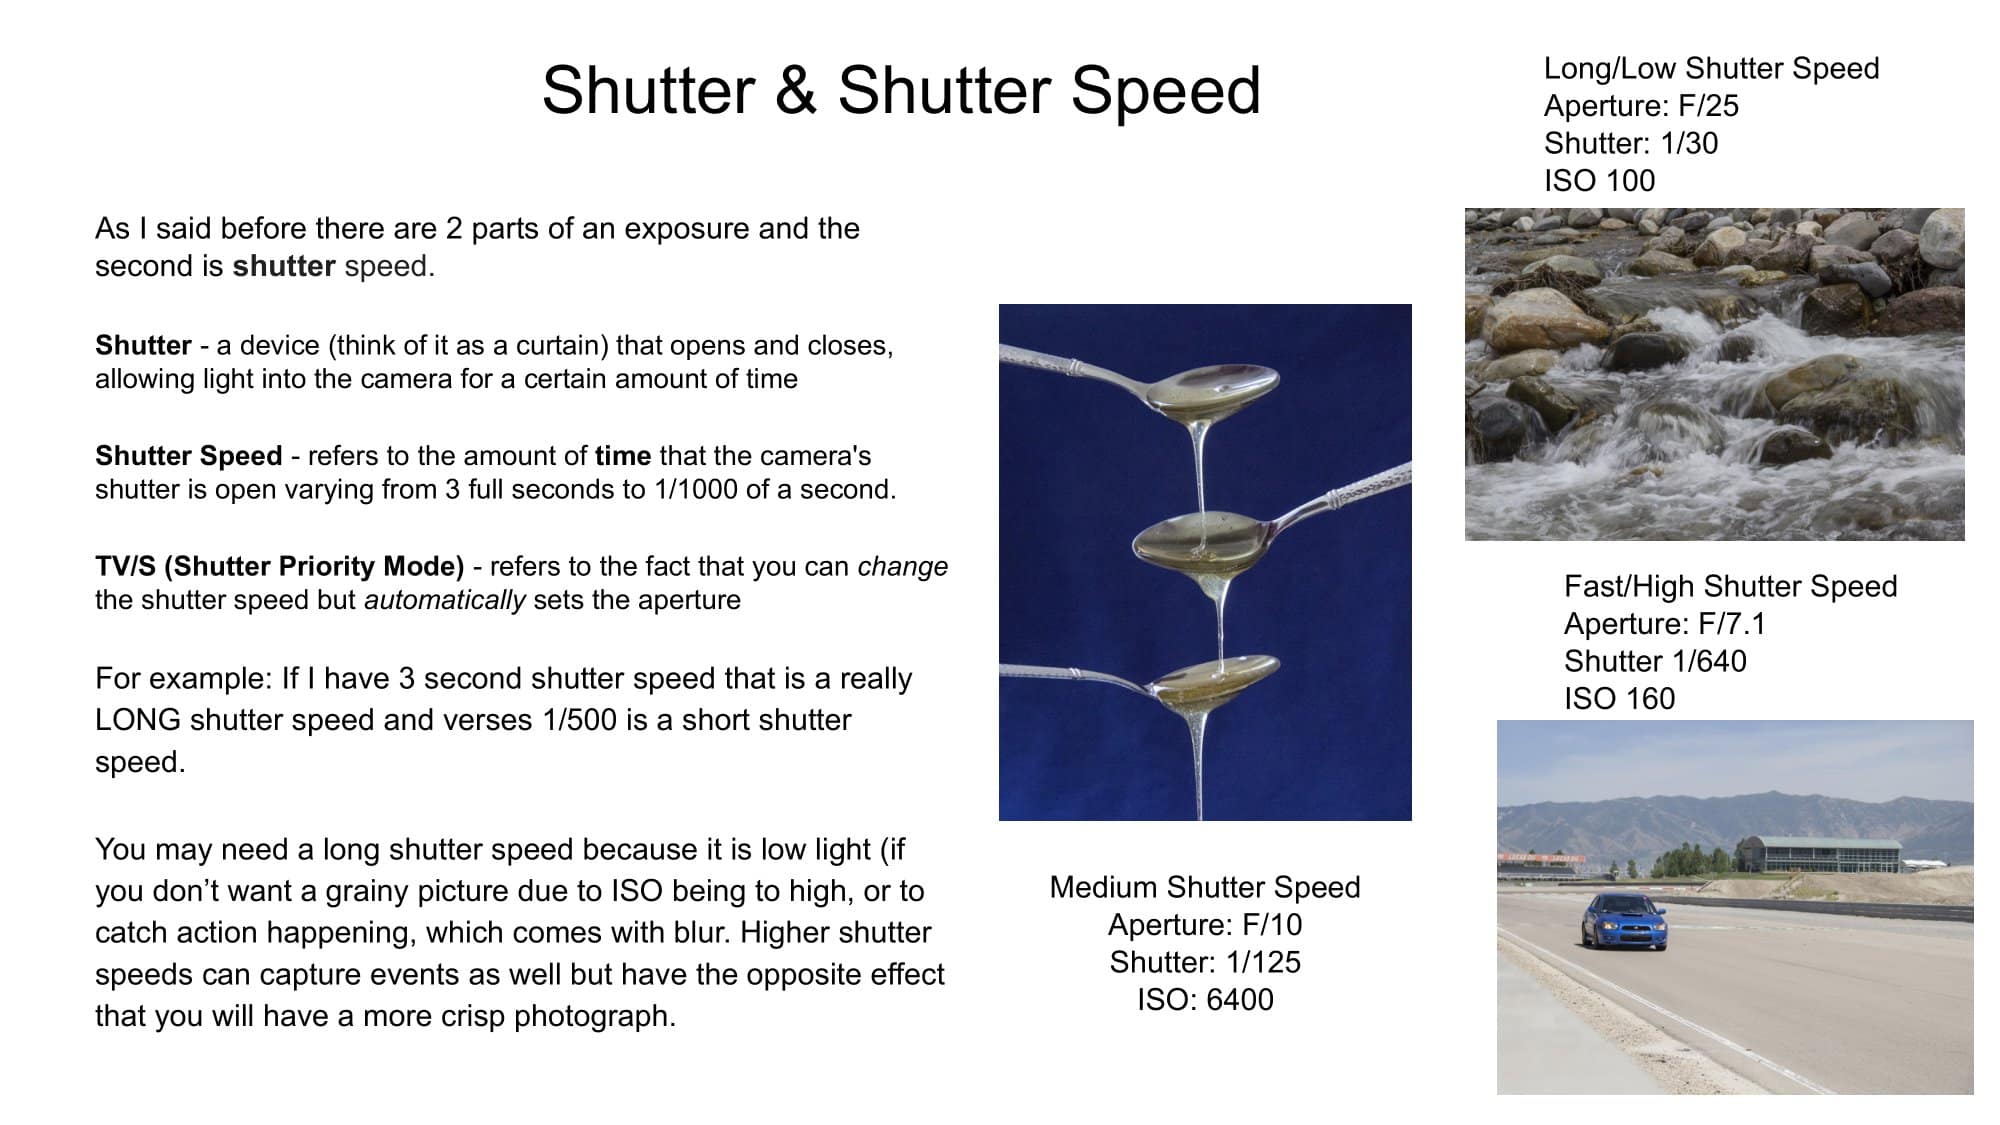
Before we dive into the details of the shutter speed chart, let’s first explore the basics of shutter speed. Put simply, shutter speed refers to the length of time the camera’s shutter remains open, allowing light to enter and reach the camera sensor. It controls the exposure of an image and plays a vital role in capturing motion or freezing it. As a photographer, you have the power to control the shutter speed, enabling you to capture moving subjects with clarity or create dynamic effects through intentional blurring.
The Basics of Shutter Speed
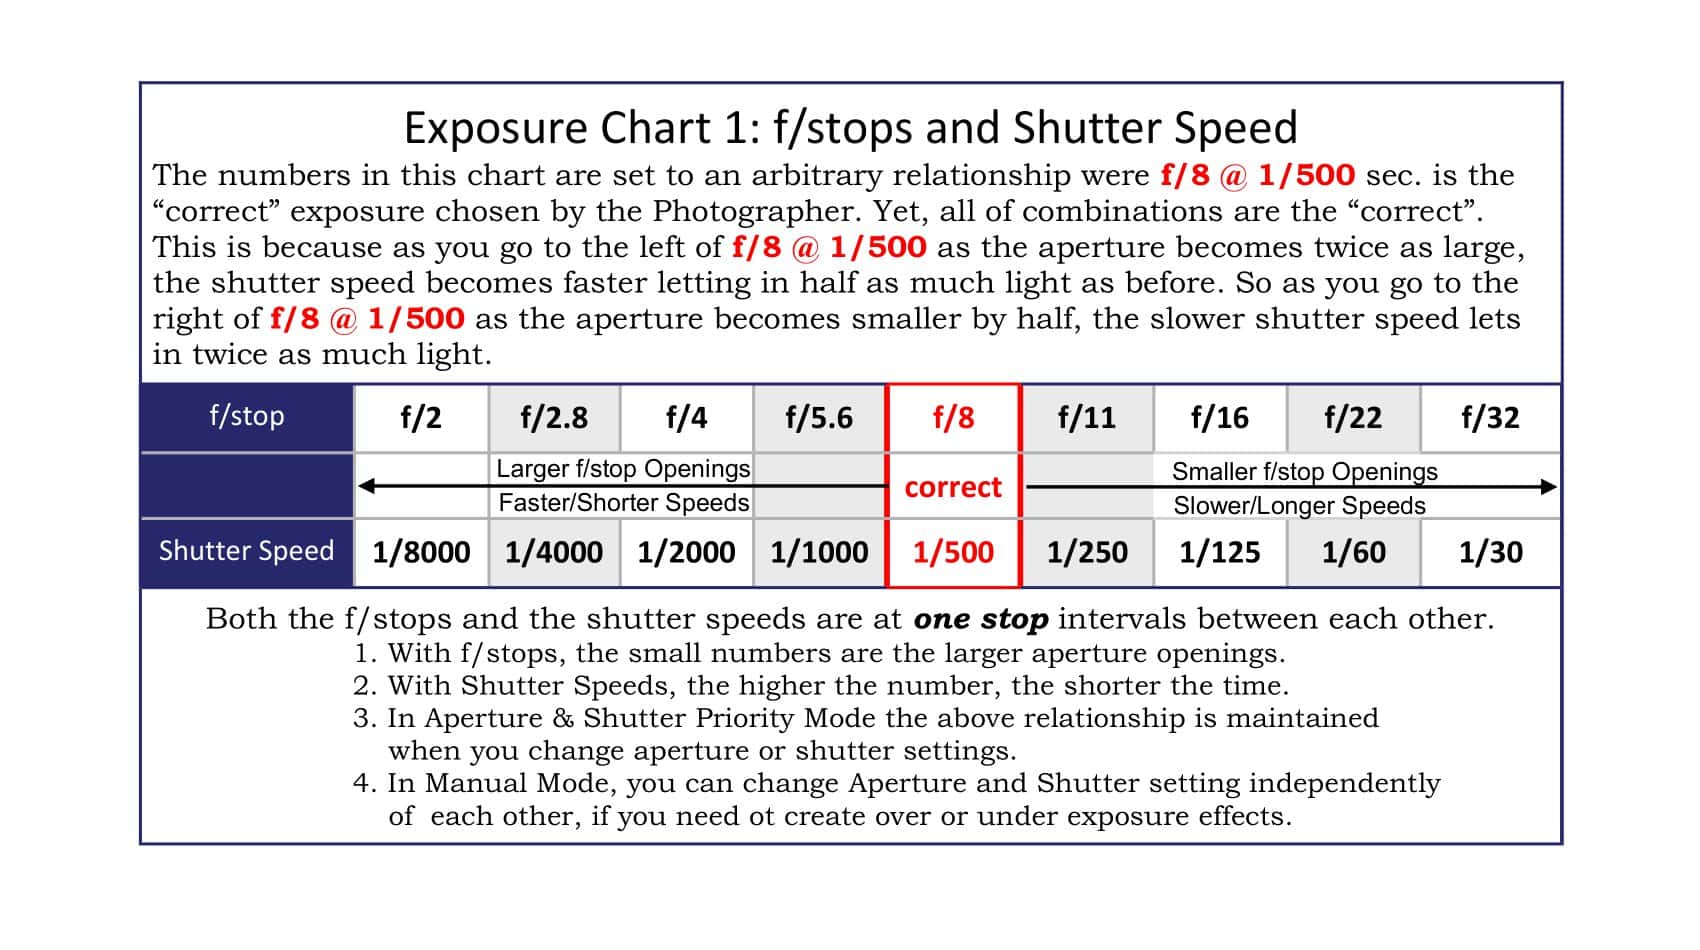
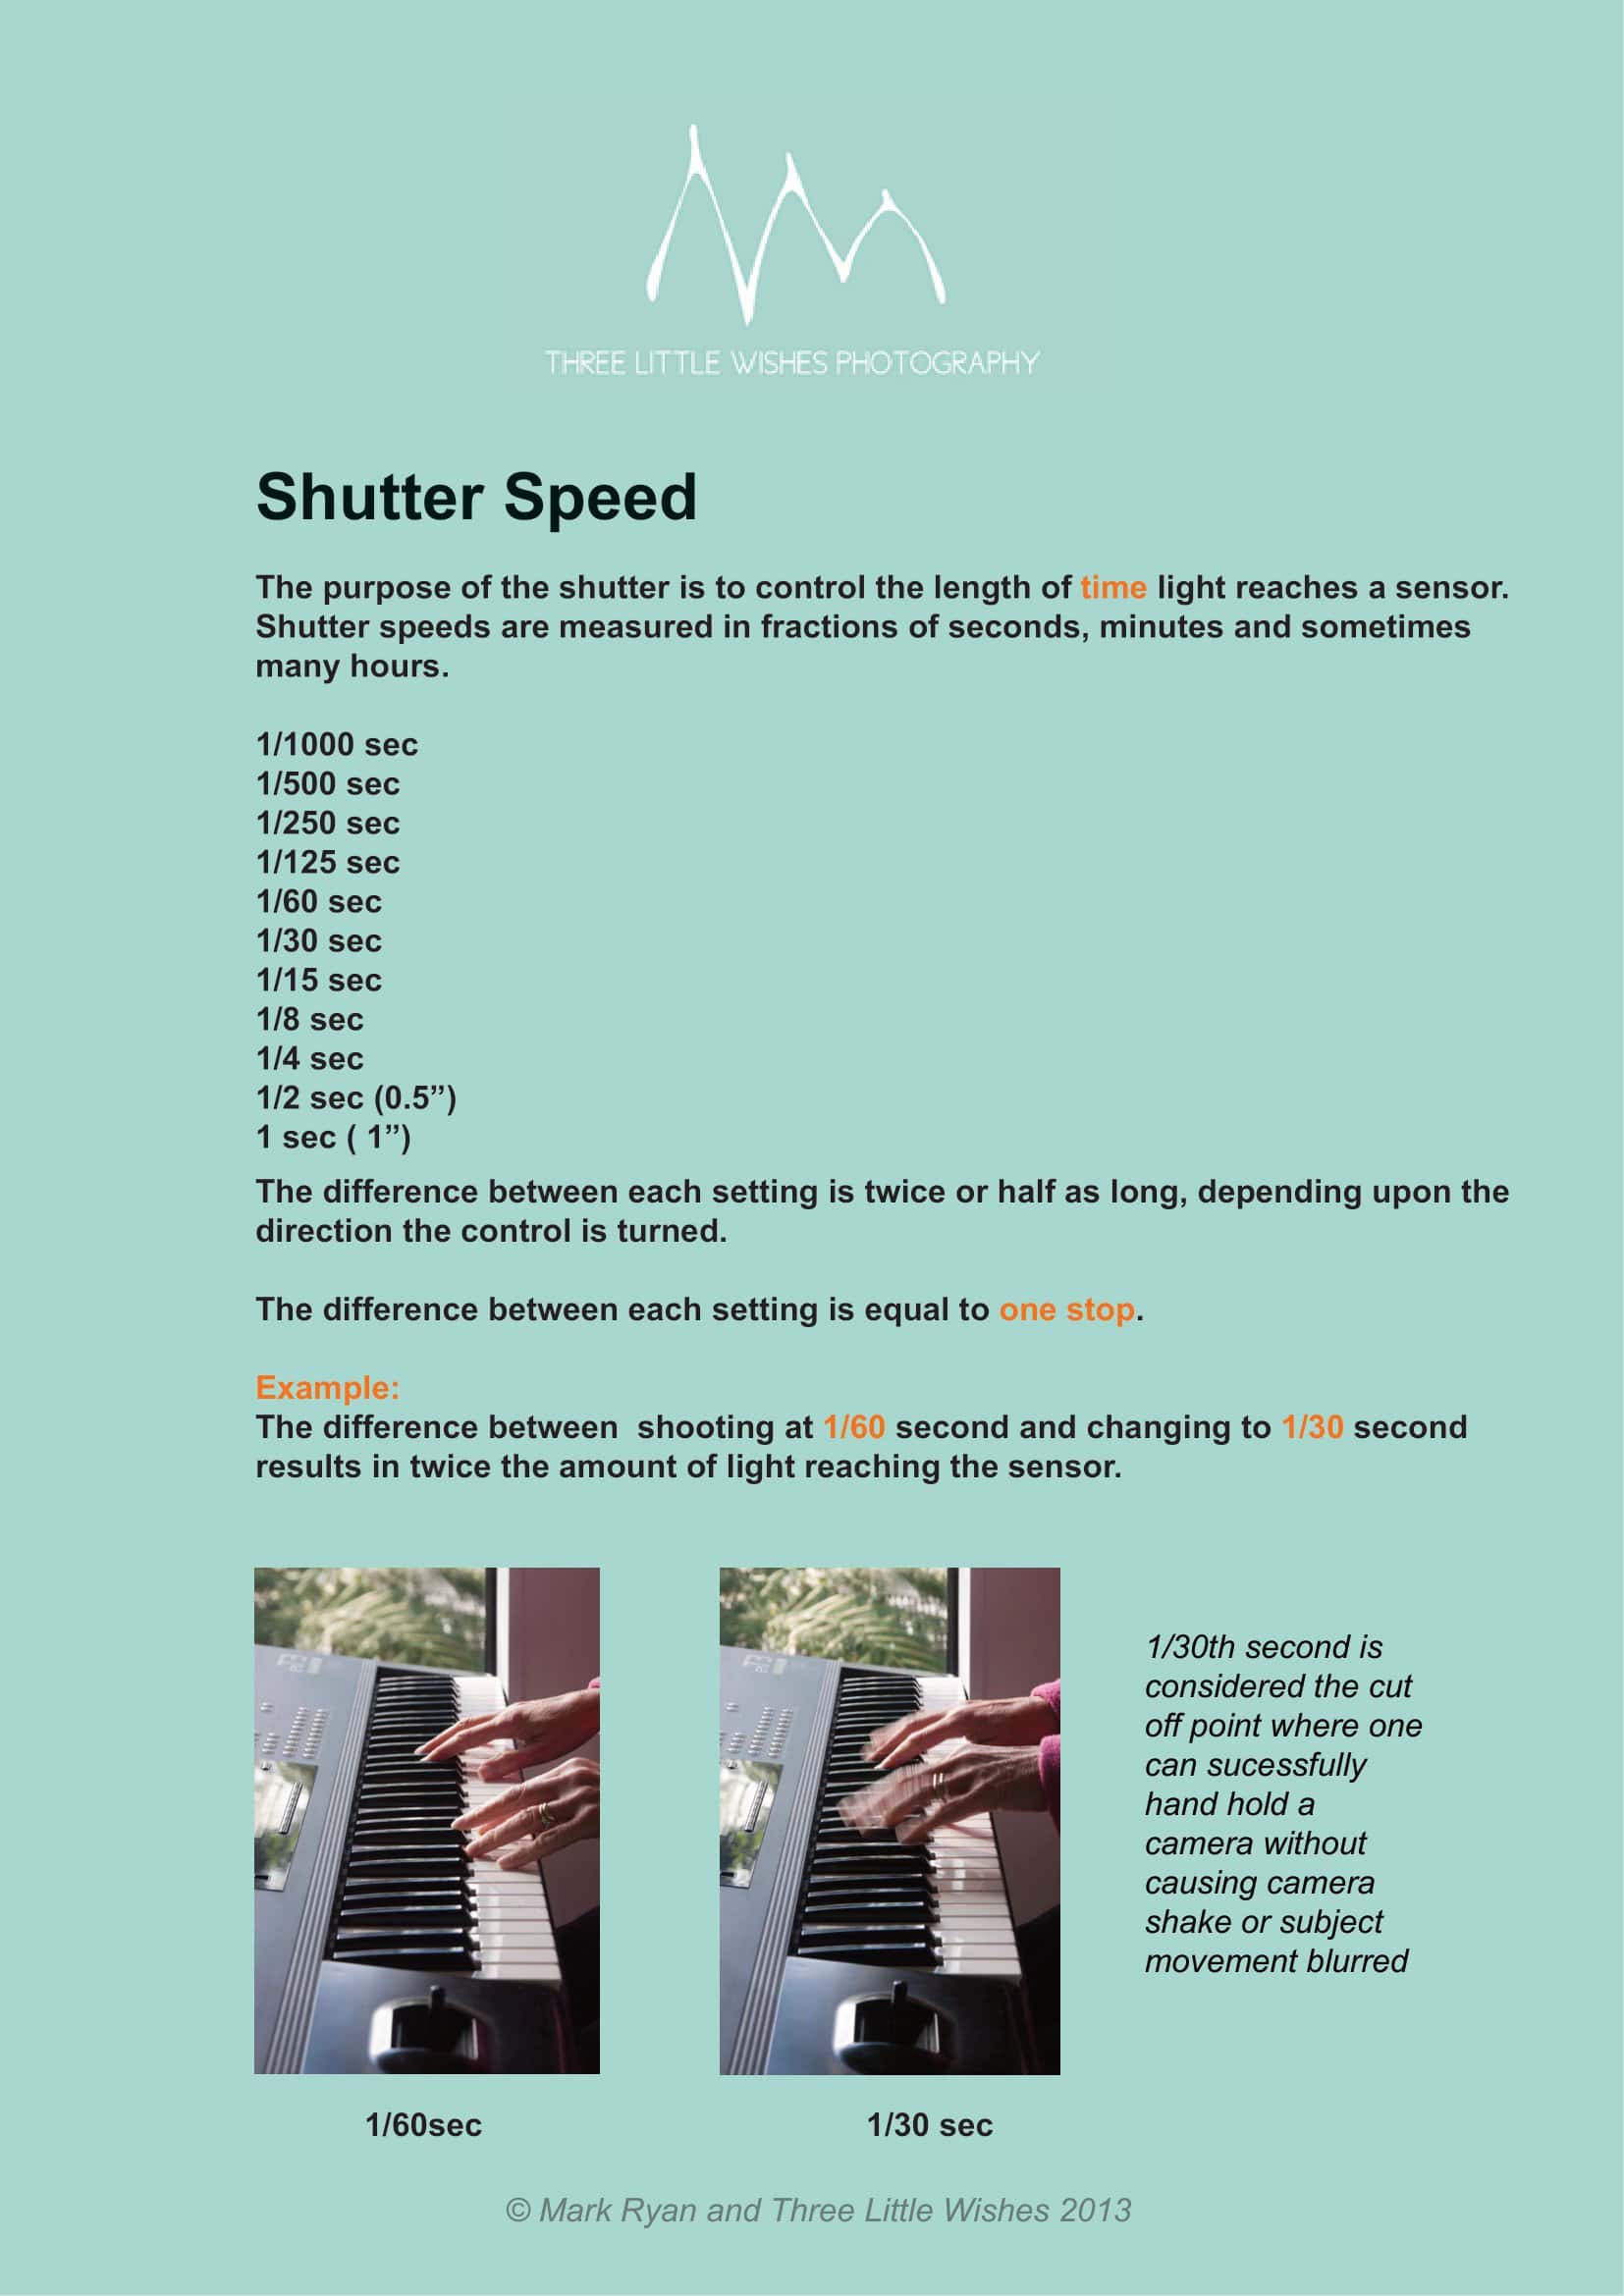
When it comes to shutter speed, it is crucial to understand that it is measured in fractions of a second. For example, a shutter speed of 1/500th of a second means that the camera’s shutter is open for only 1/500th of a second, allowing a small amount of light to reach the sensor. On the other hand, a slower shutter speed, such as 1/30th of a second, keeps the shutter open for a longer duration, allowing more light to enter the camera. This simple concept forms the foundation of shutter speed photography.
How Shutter Speed Affects Your Photos
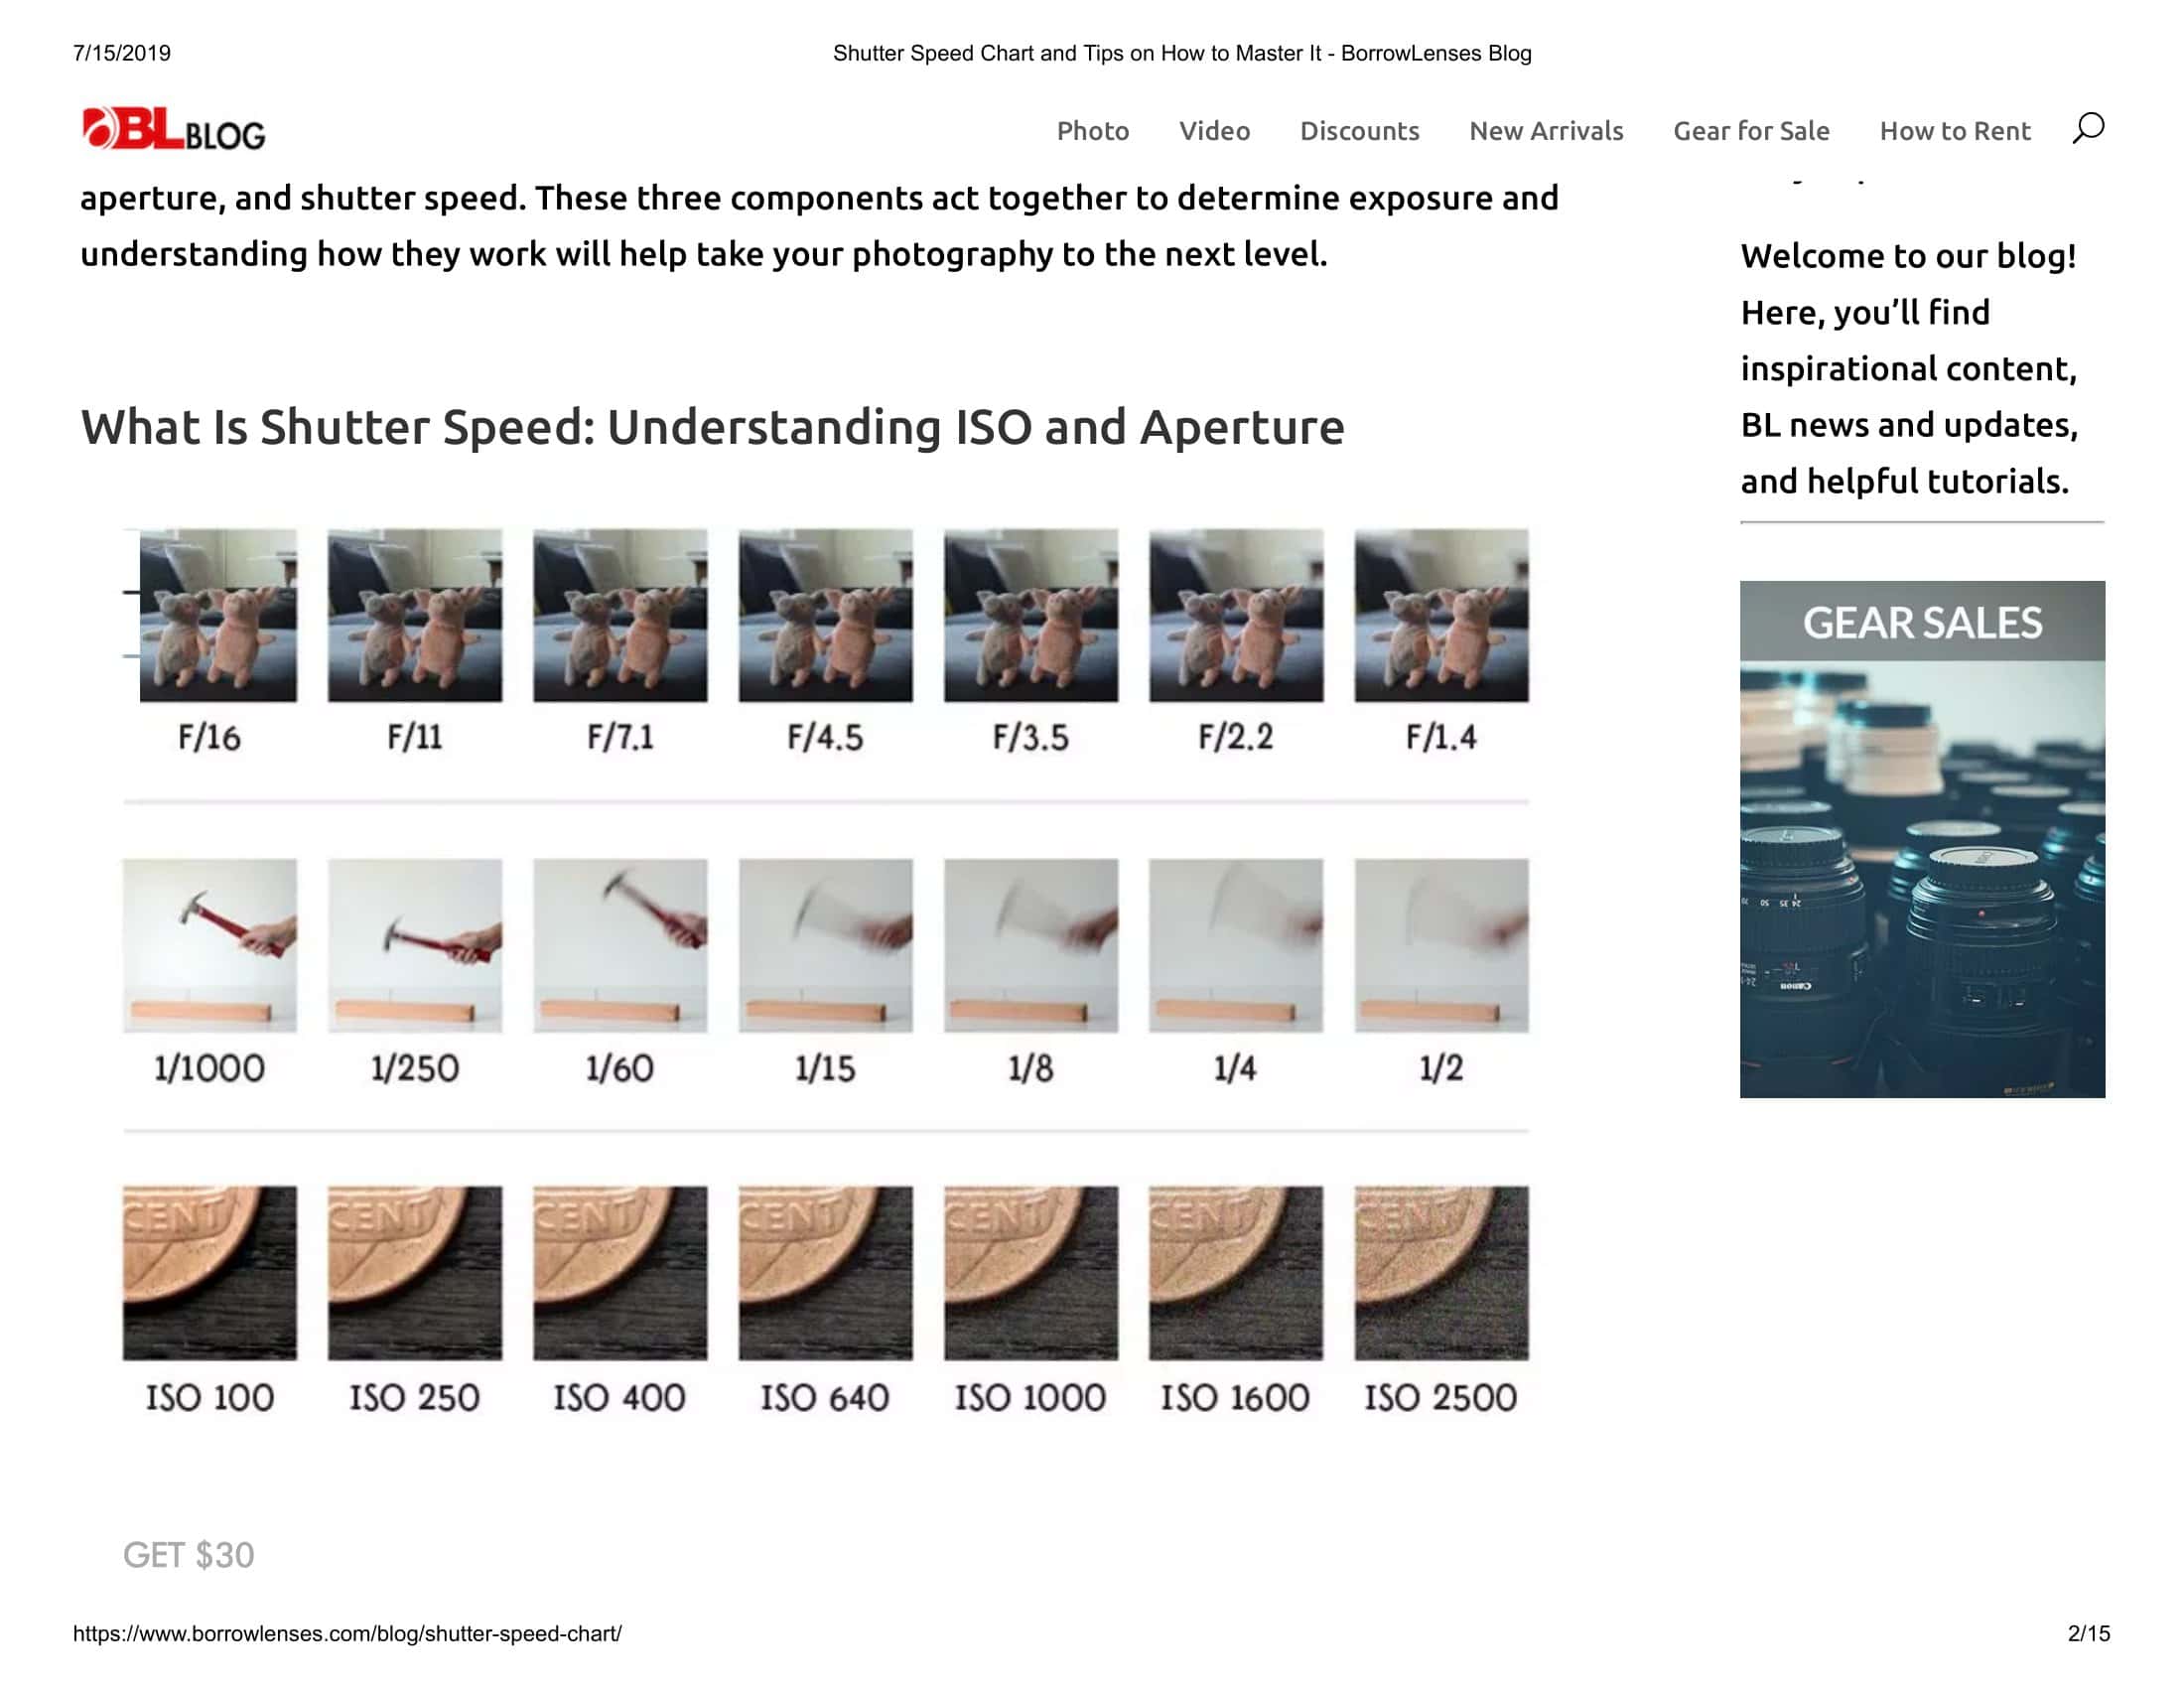
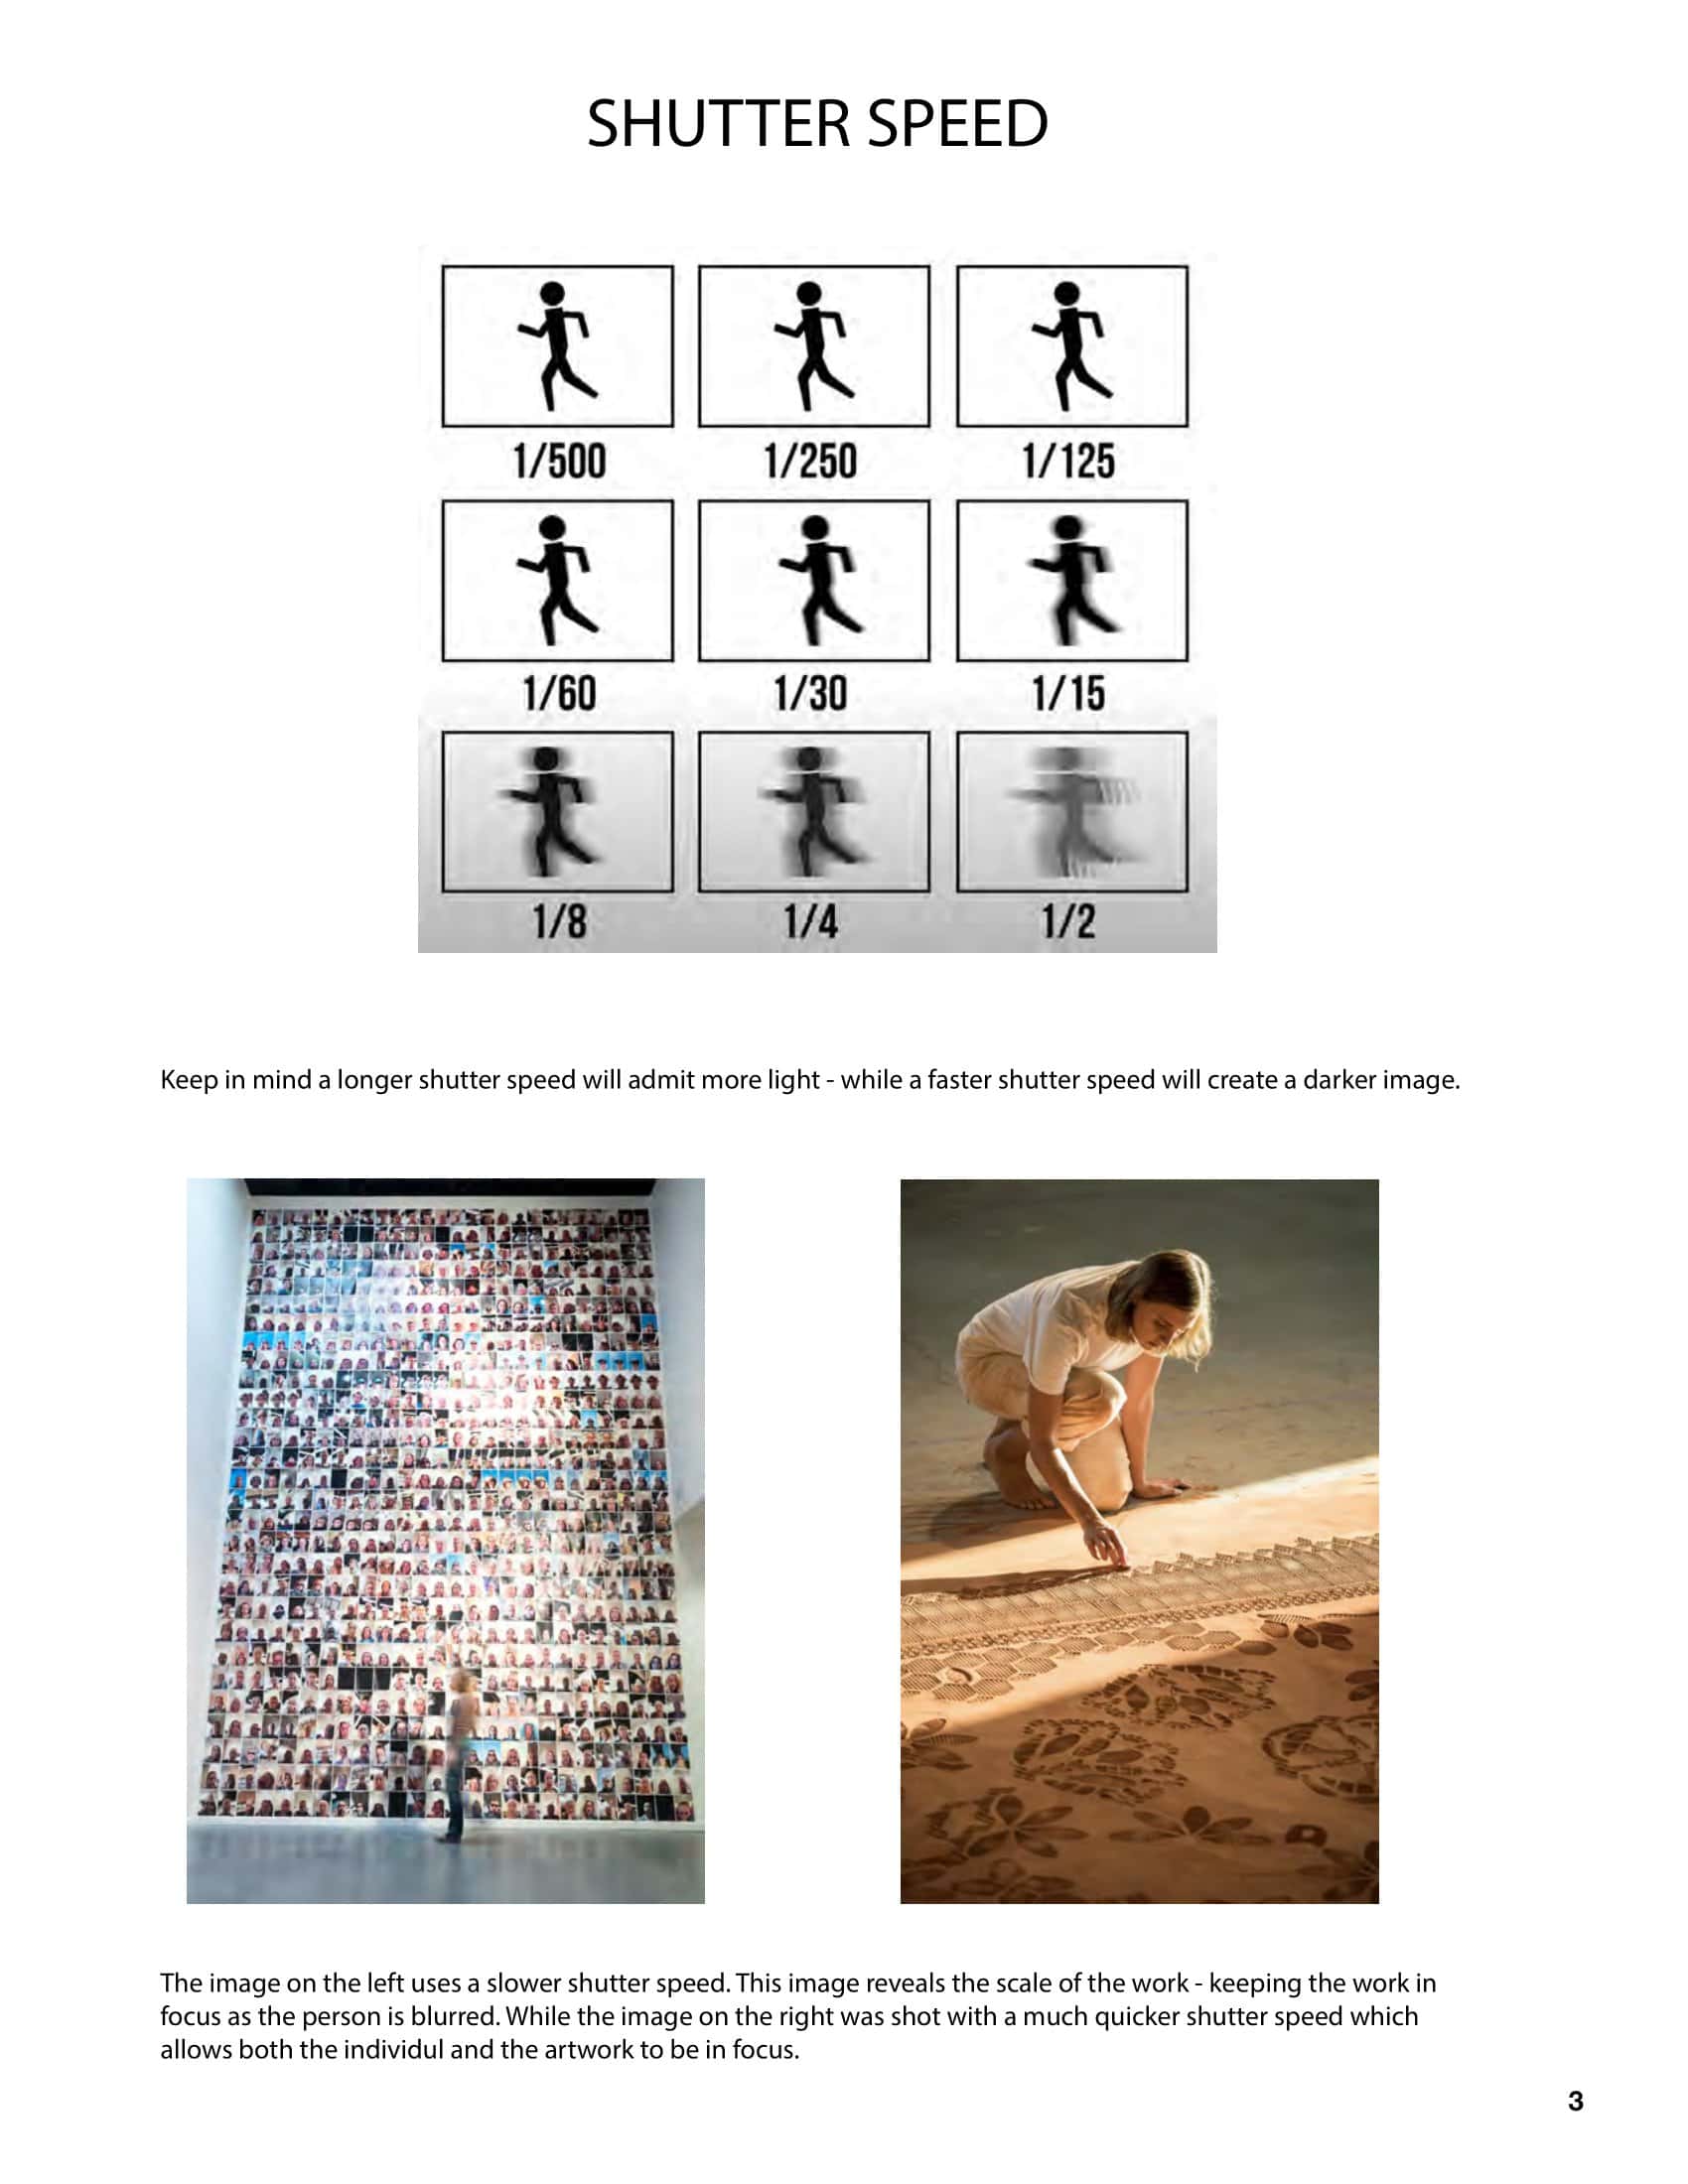
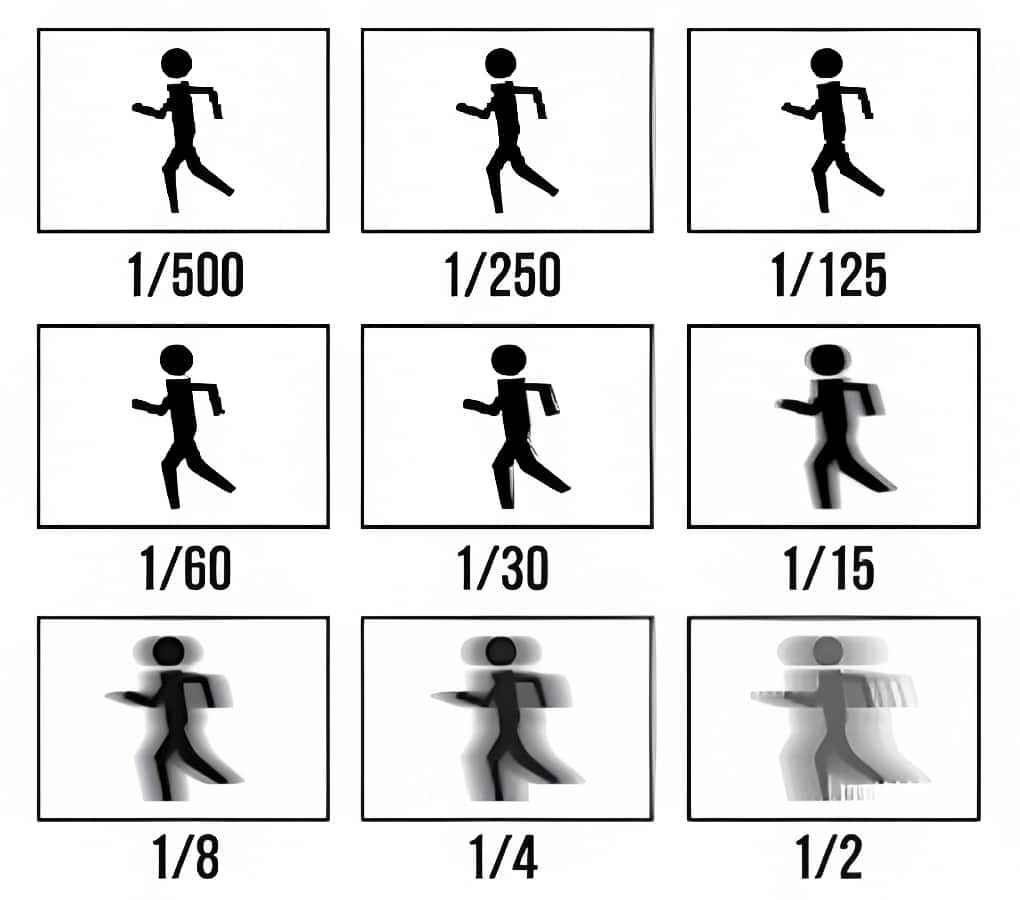
Shutter speed not only controls the amount of light entering the camera but also affects the image’s overall sharpness and motion blur. A faster shutter speed freezes motion, making it ideal for capturing subjects with rapid movement, such as sports or wildlife photography. On the other hand, a slower shutter speed introduces intentional motion blur, which can add a sense of dynamism to images, particularly in situations like waterfalls or car light trails.
Let’s delve deeper into the impact of shutter speed on image sharpness. When using a faster shutter speed, the camera’s sensor captures a split-second moment, resulting in a crisp and sharp image. This is especially beneficial when photographing fast-moving subjects like athletes in action or birds in flight. The high shutter speed allows you to freeze the motion and capture every detail with precision, showcasing the subject’s agility and grace.
On the contrary, when using a slower shutter speed, the camera’s sensor remains exposed to light for a longer duration, resulting in a blurred effect. This intentional motion blur can be used creatively to convey a sense of movement and energy in your photographs. For example, when photographing a flowing river, using a slower shutter speed will create a smooth and silky effect, emphasizing the water’s graceful flow. Similarly, when capturing car light trails at night, a slow shutter speed will create streaks of light, adding a dynamic and captivating element to your images.
The Role of Shutter Speed in Exposure
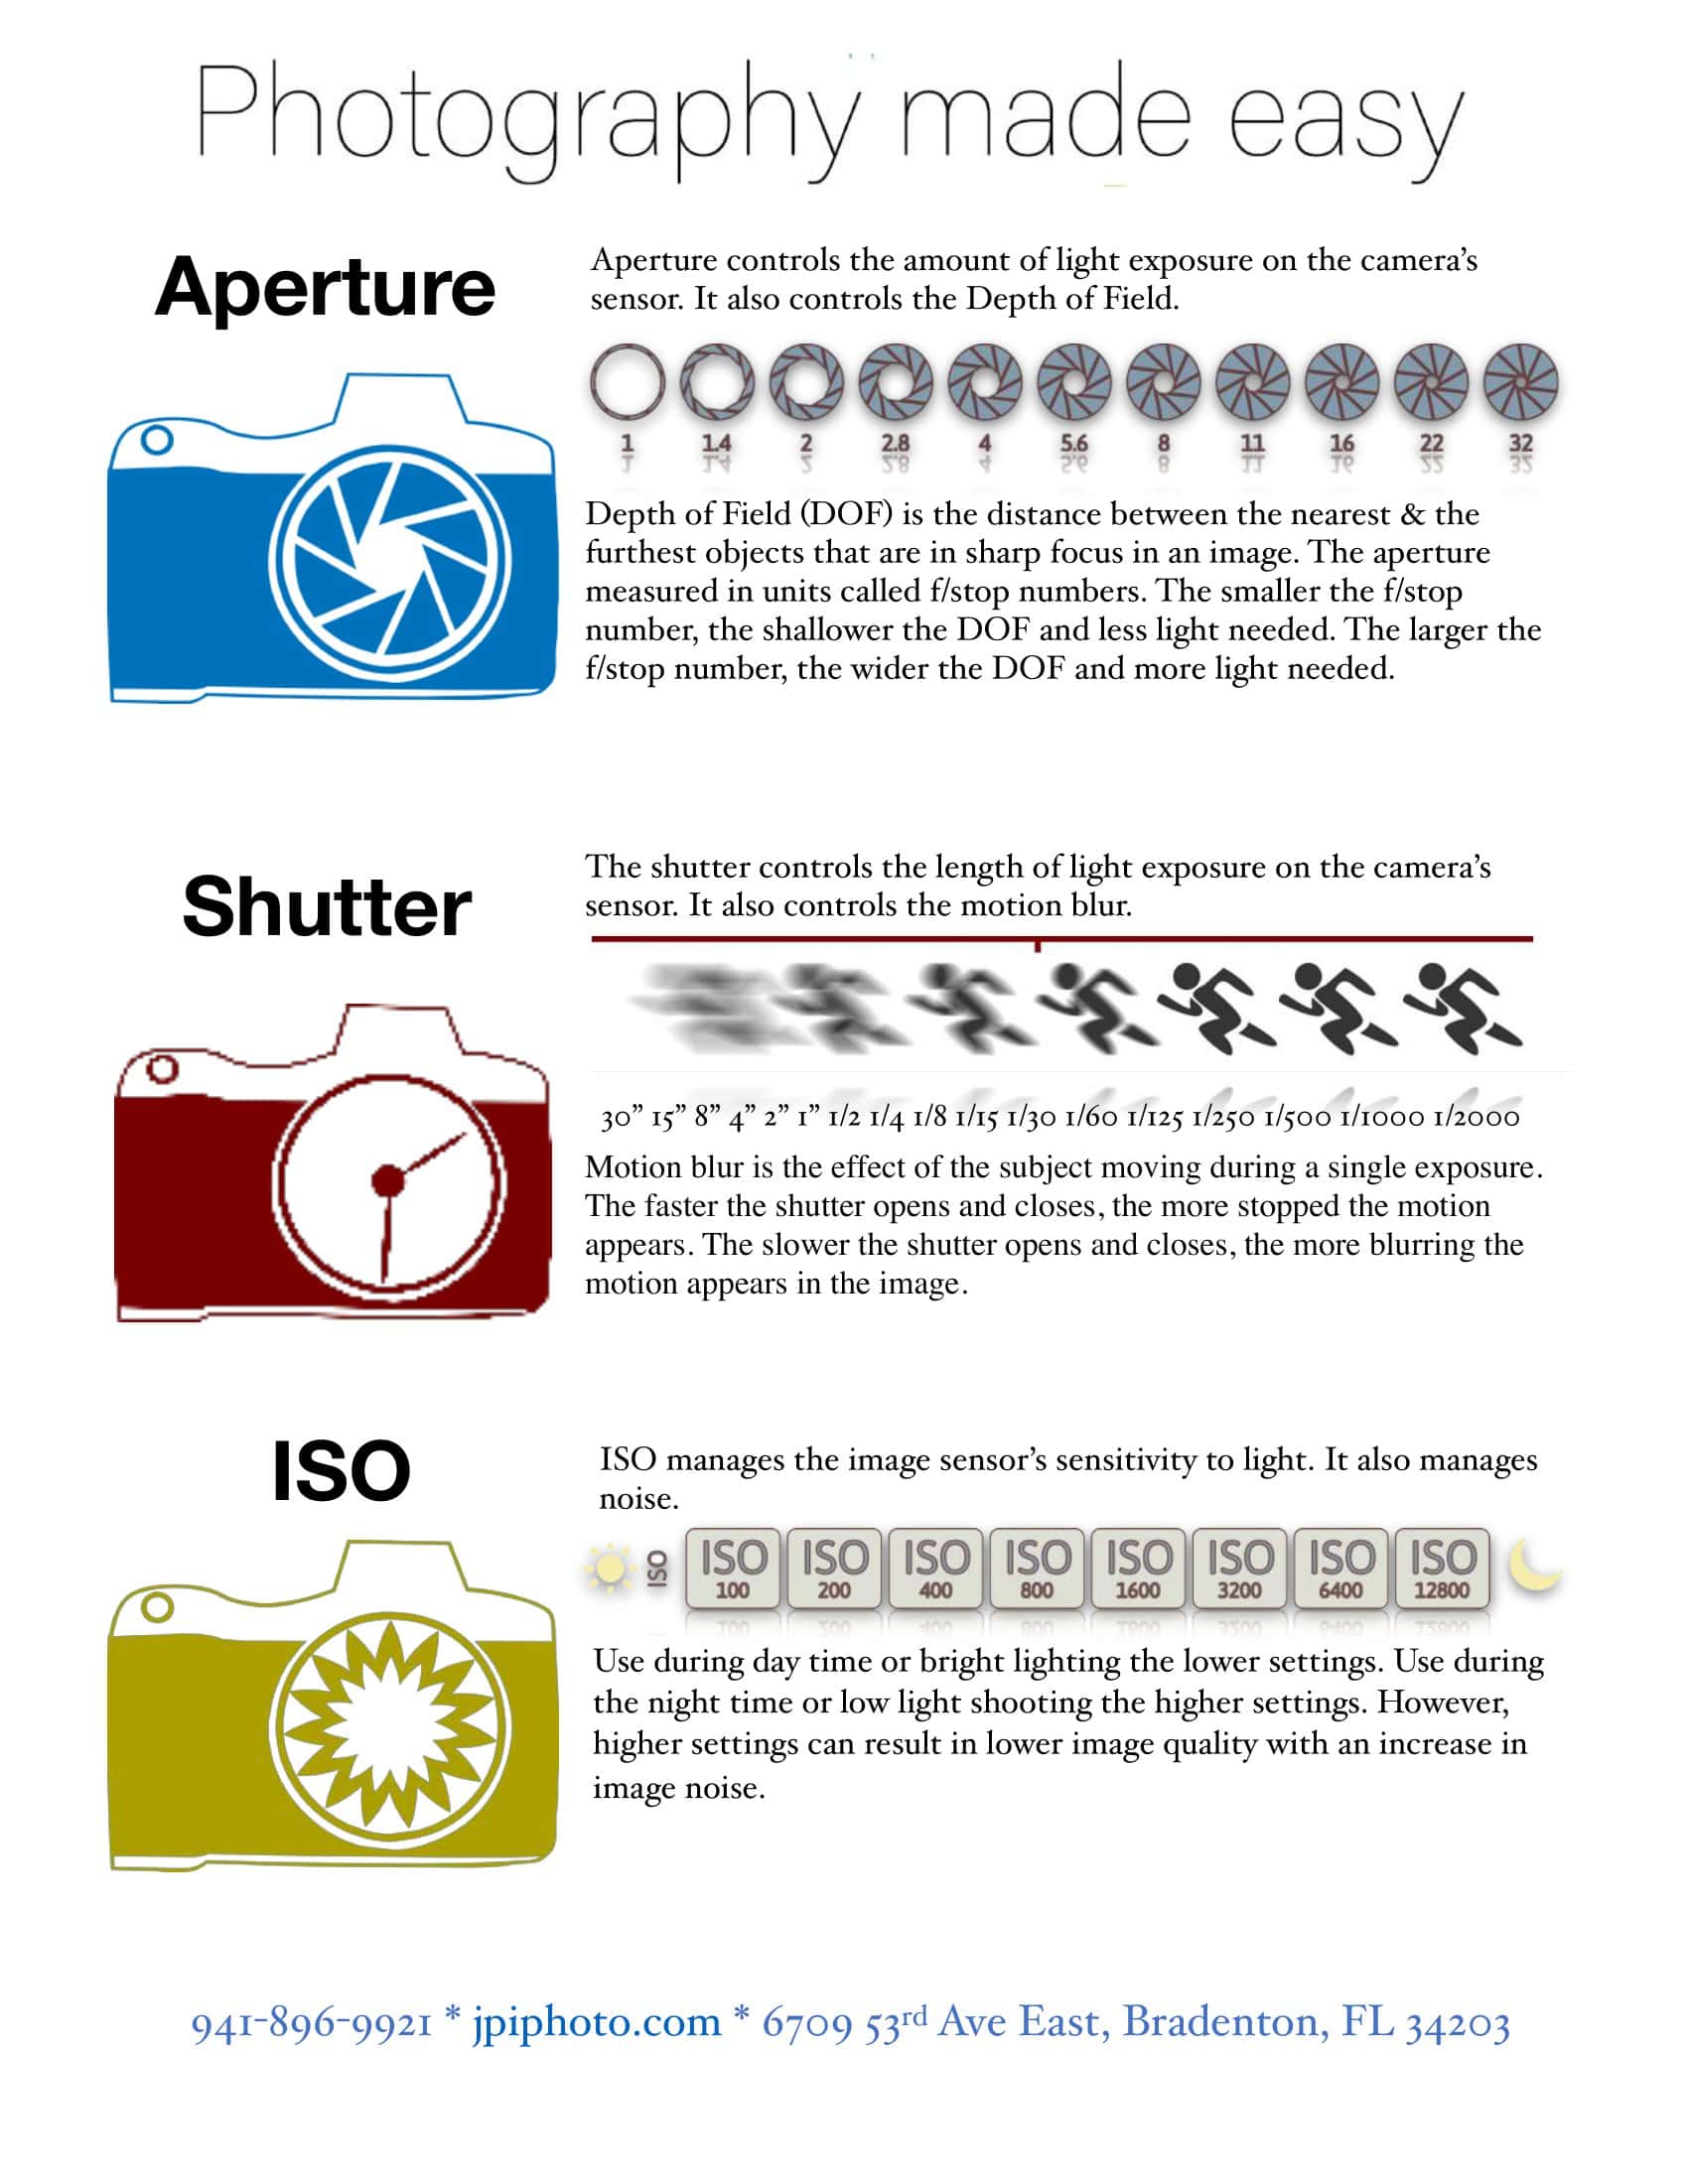
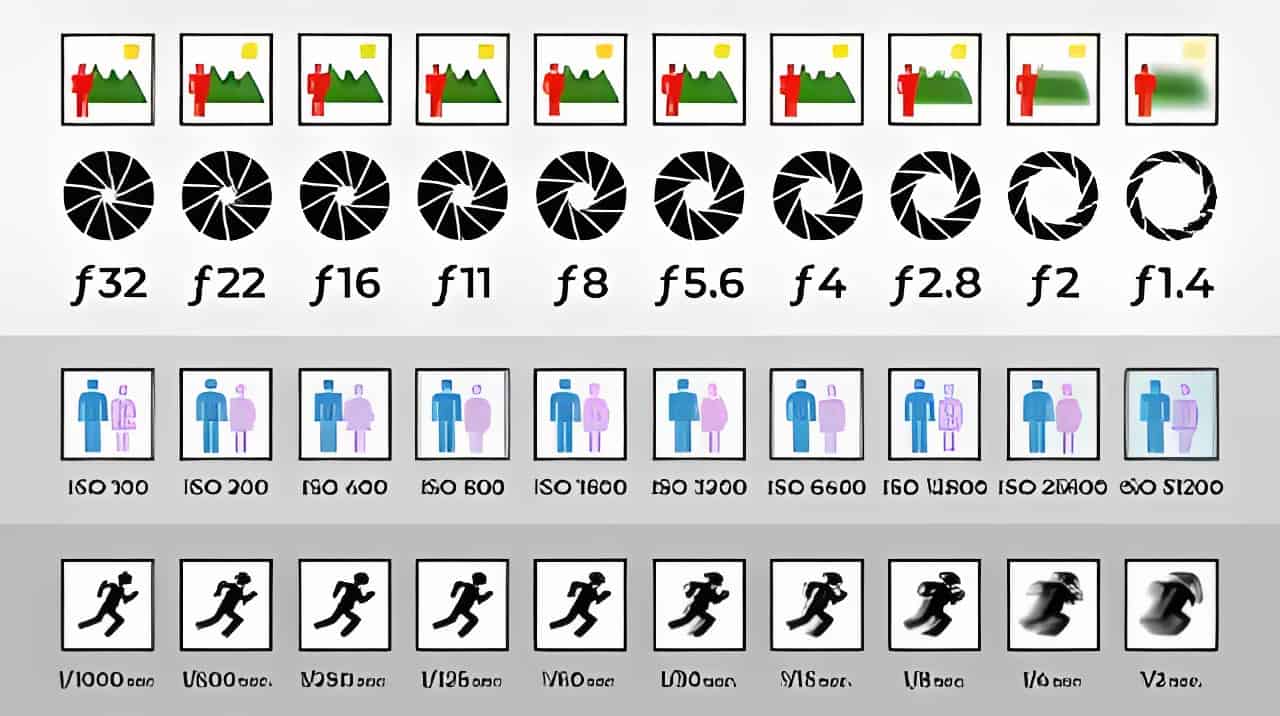
In addition to controlling motion, shutter speed works in conjunction with aperture and ISO to achieve proper exposure. These three elements form the exposure triangle, and understanding their relationship is essential for capturing well-exposed photographs.
When it comes to photography, finding the right balance between shutter speed and aperture is crucial. While shutter speed controls the amount of light, aperture determines the depth of field – the range of sharpness in an image. A wider aperture, such as f/1.8, allows more light to pass through the lens but results in a shallower depth of field. This can be ideal for portraits, where you want the subject to stand out from a soft, blurred background. On the other hand, a smaller aperture, like f/16, limits the amount of light reaching the sensor but provides a greater depth of field. This is often preferred in landscape photography, where you want everything from the foreground to the background to be in sharp focus. It is essential to find the right balance between these two elements to achieve the desired exposure and depth of field for your composition.
Shutter speed and ISO also have a crucial relationship in achieving proper exposure. ISO, the camera’s sensitivity to light, complements the relationship between shutter speed and aperture. A higher ISO setting allows the sensor to capture more light in low-light situations but can introduce digital noise into the image. This noise can result in a grainy appearance, reducing the overall quality of the photograph. On the other hand, a lower ISO setting decreases the sensor’s sensitivity to light but ensures cleaner and sharper images. When adjusting the shutter speed, consider the ISO setting to maintain proper exposure and noise control. It is important to strike the right balance between capturing enough light and minimizing noise to achieve the best possible image quality.
Mastering the Exposure Triangle
Understanding the relationship between shutter speed, aperture, and ISO is the key to mastering the exposure triangle. By manipulating these three elements, photographers can achieve their desired creative effects and capture well-exposed images in various lighting conditions.
Experimenting with different combinations of shutter speed, aperture, and ISO can lead to exciting and unique results. For example, using a slow shutter speed in combination with a narrow aperture can create a beautiful motion blur effect, perfect for capturing the movement of flowing water or the streaks of car lights at night. On the other hand, a fast shutter speed combined with a wide aperture can freeze action, allowing you to capture a precise moment in time, such as a bird in flight or a sports player mid-action.
Understanding the role of shutter speed in exposure is not only essential for technical reasons but also for creative expression. By mastering the exposure triangle, photographers can take full control of their images and create stunning photographs that truly capture the essence of their subject.
A Detailed Look at the Shutter Speed Chart
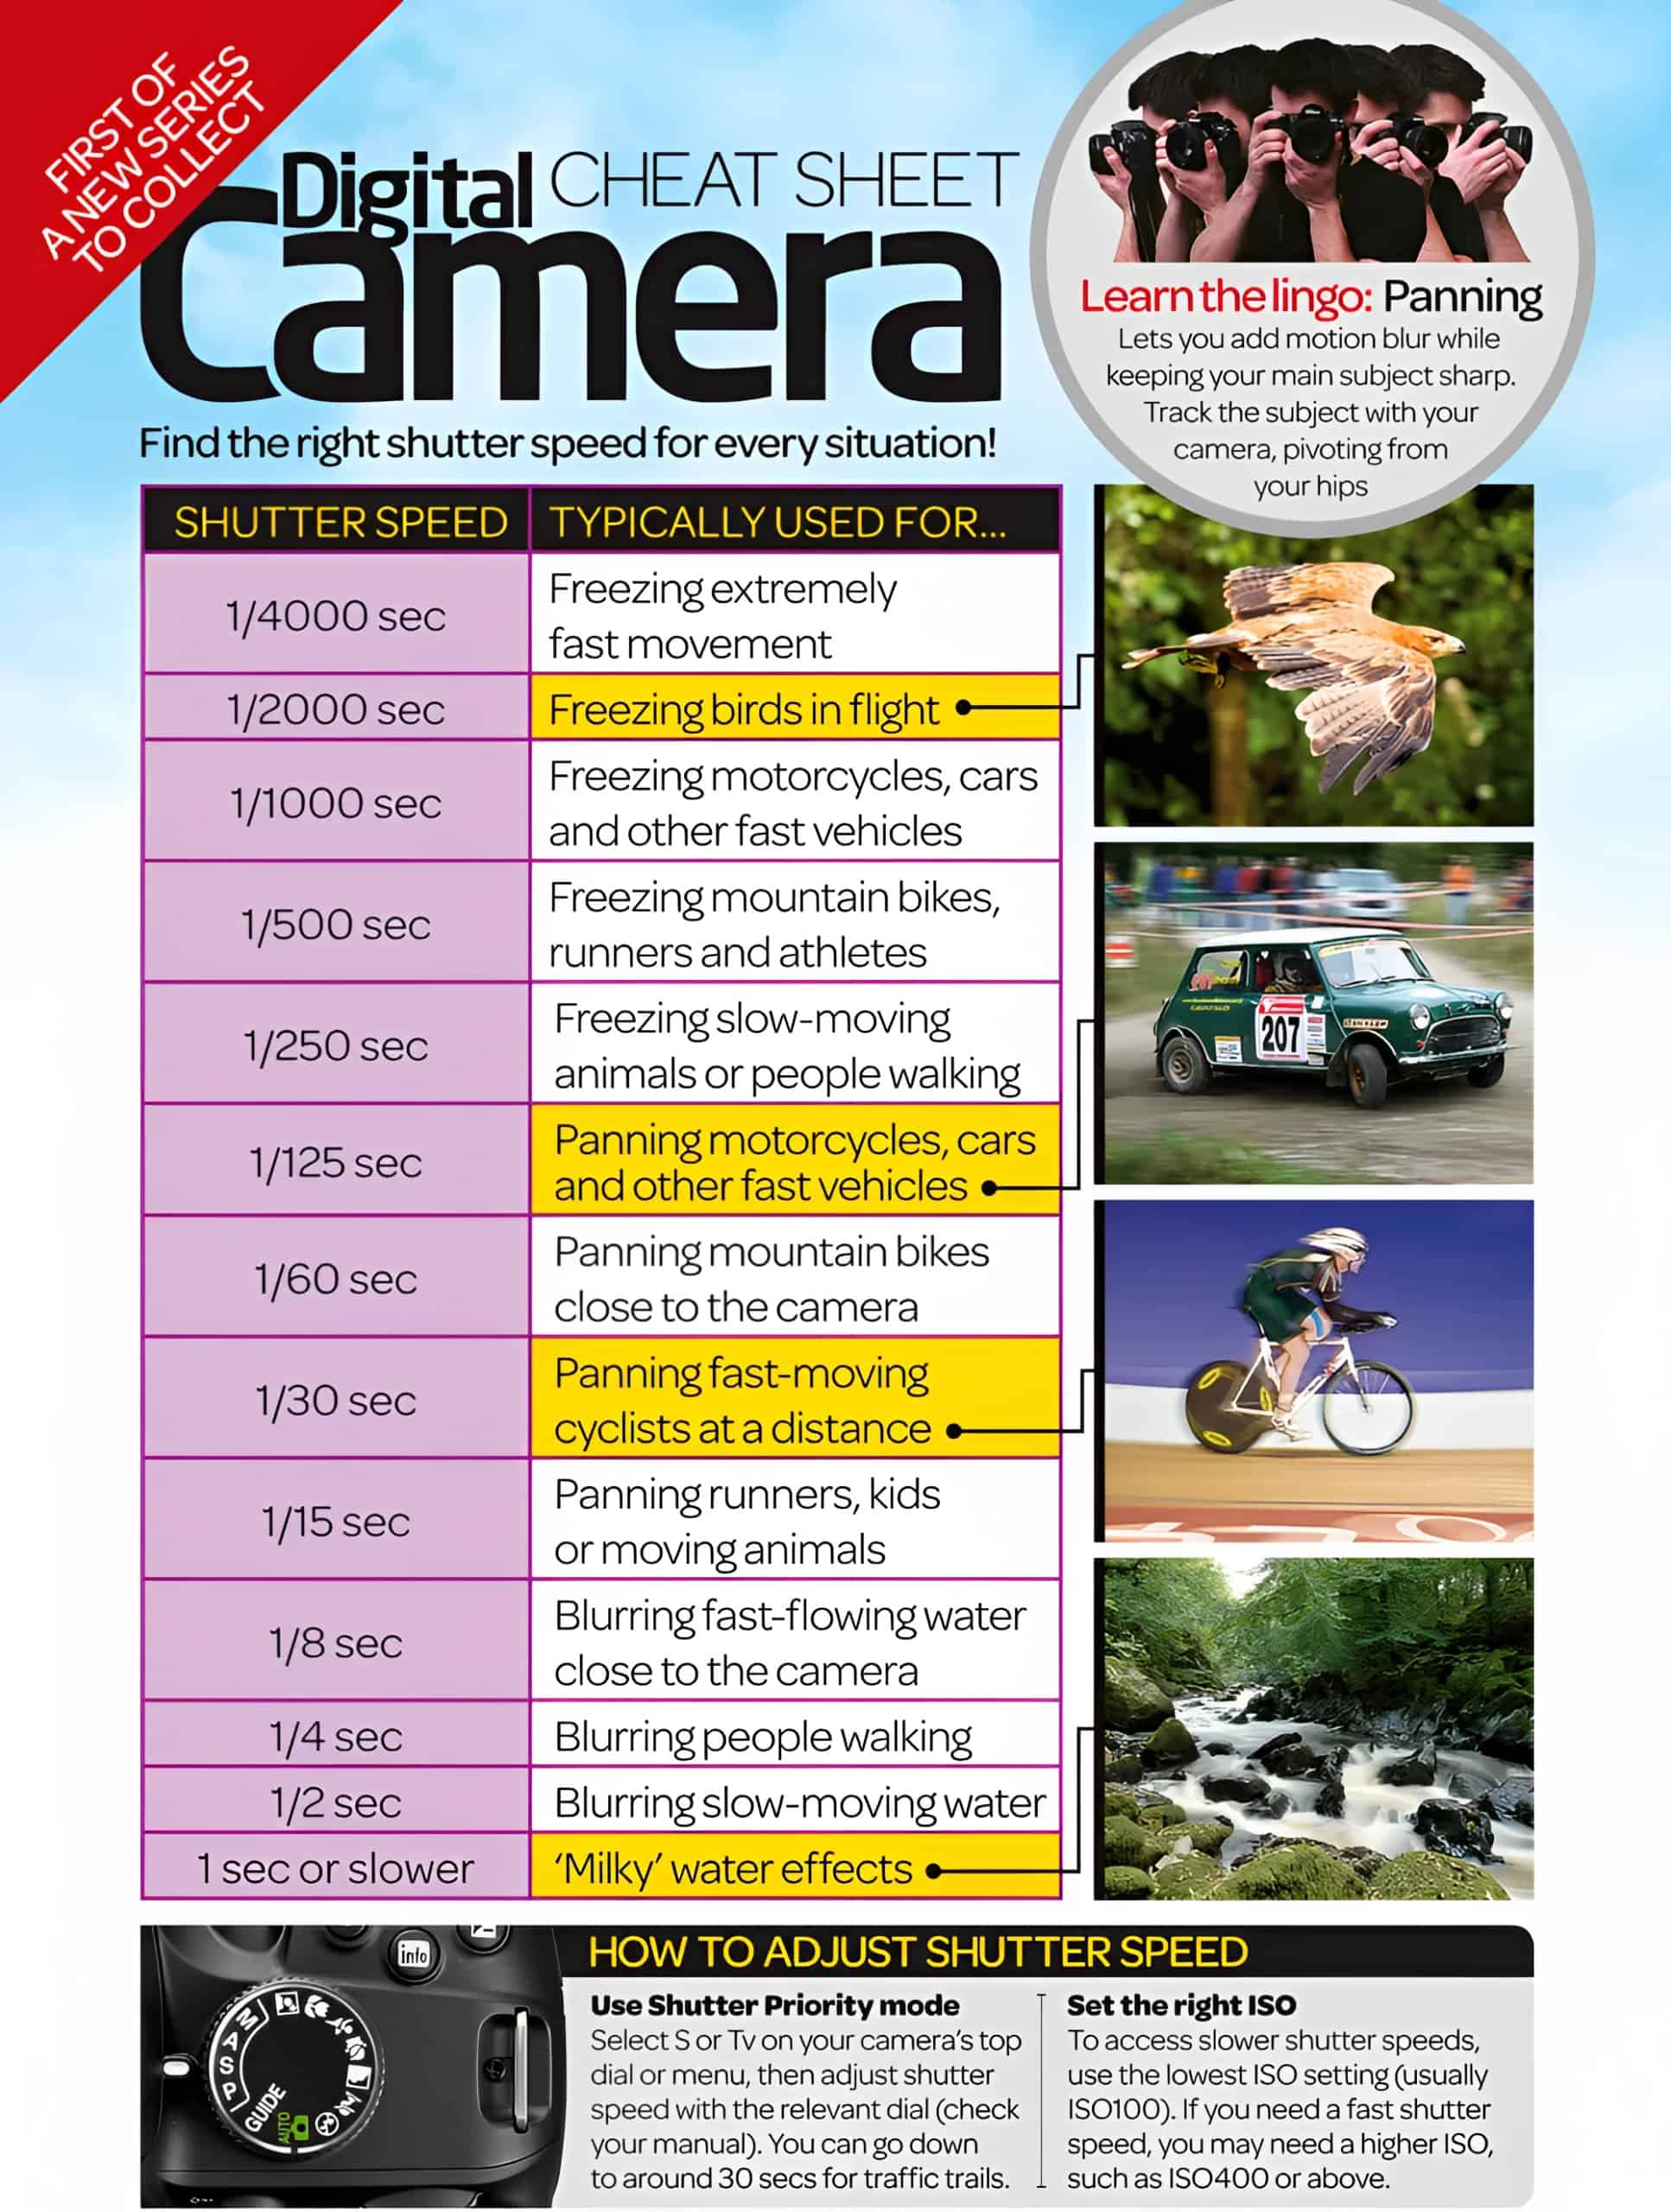
Now that we have explored the fundamentals of shutter speed and its role in exposure, let’s delve into the shutter speed chart, an indispensable tool for photographers. This chart provides a comprehensive range of shutter speeds, allowing you to make informed decisions based on the shooting conditions and desired effects.
Interpreting the Shutter Speed Chart
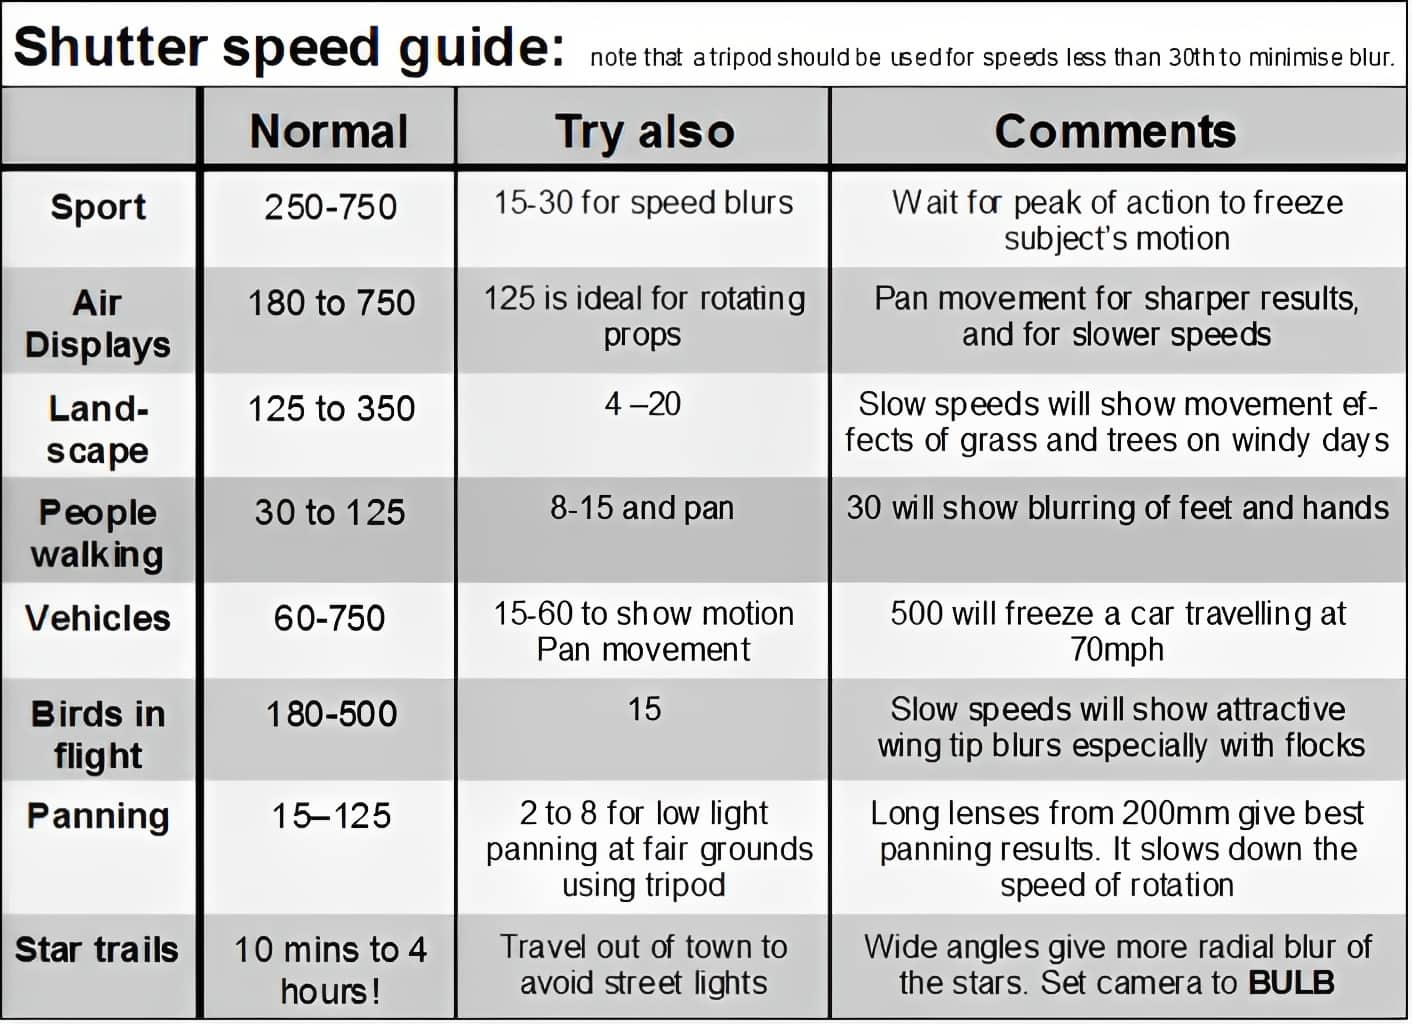
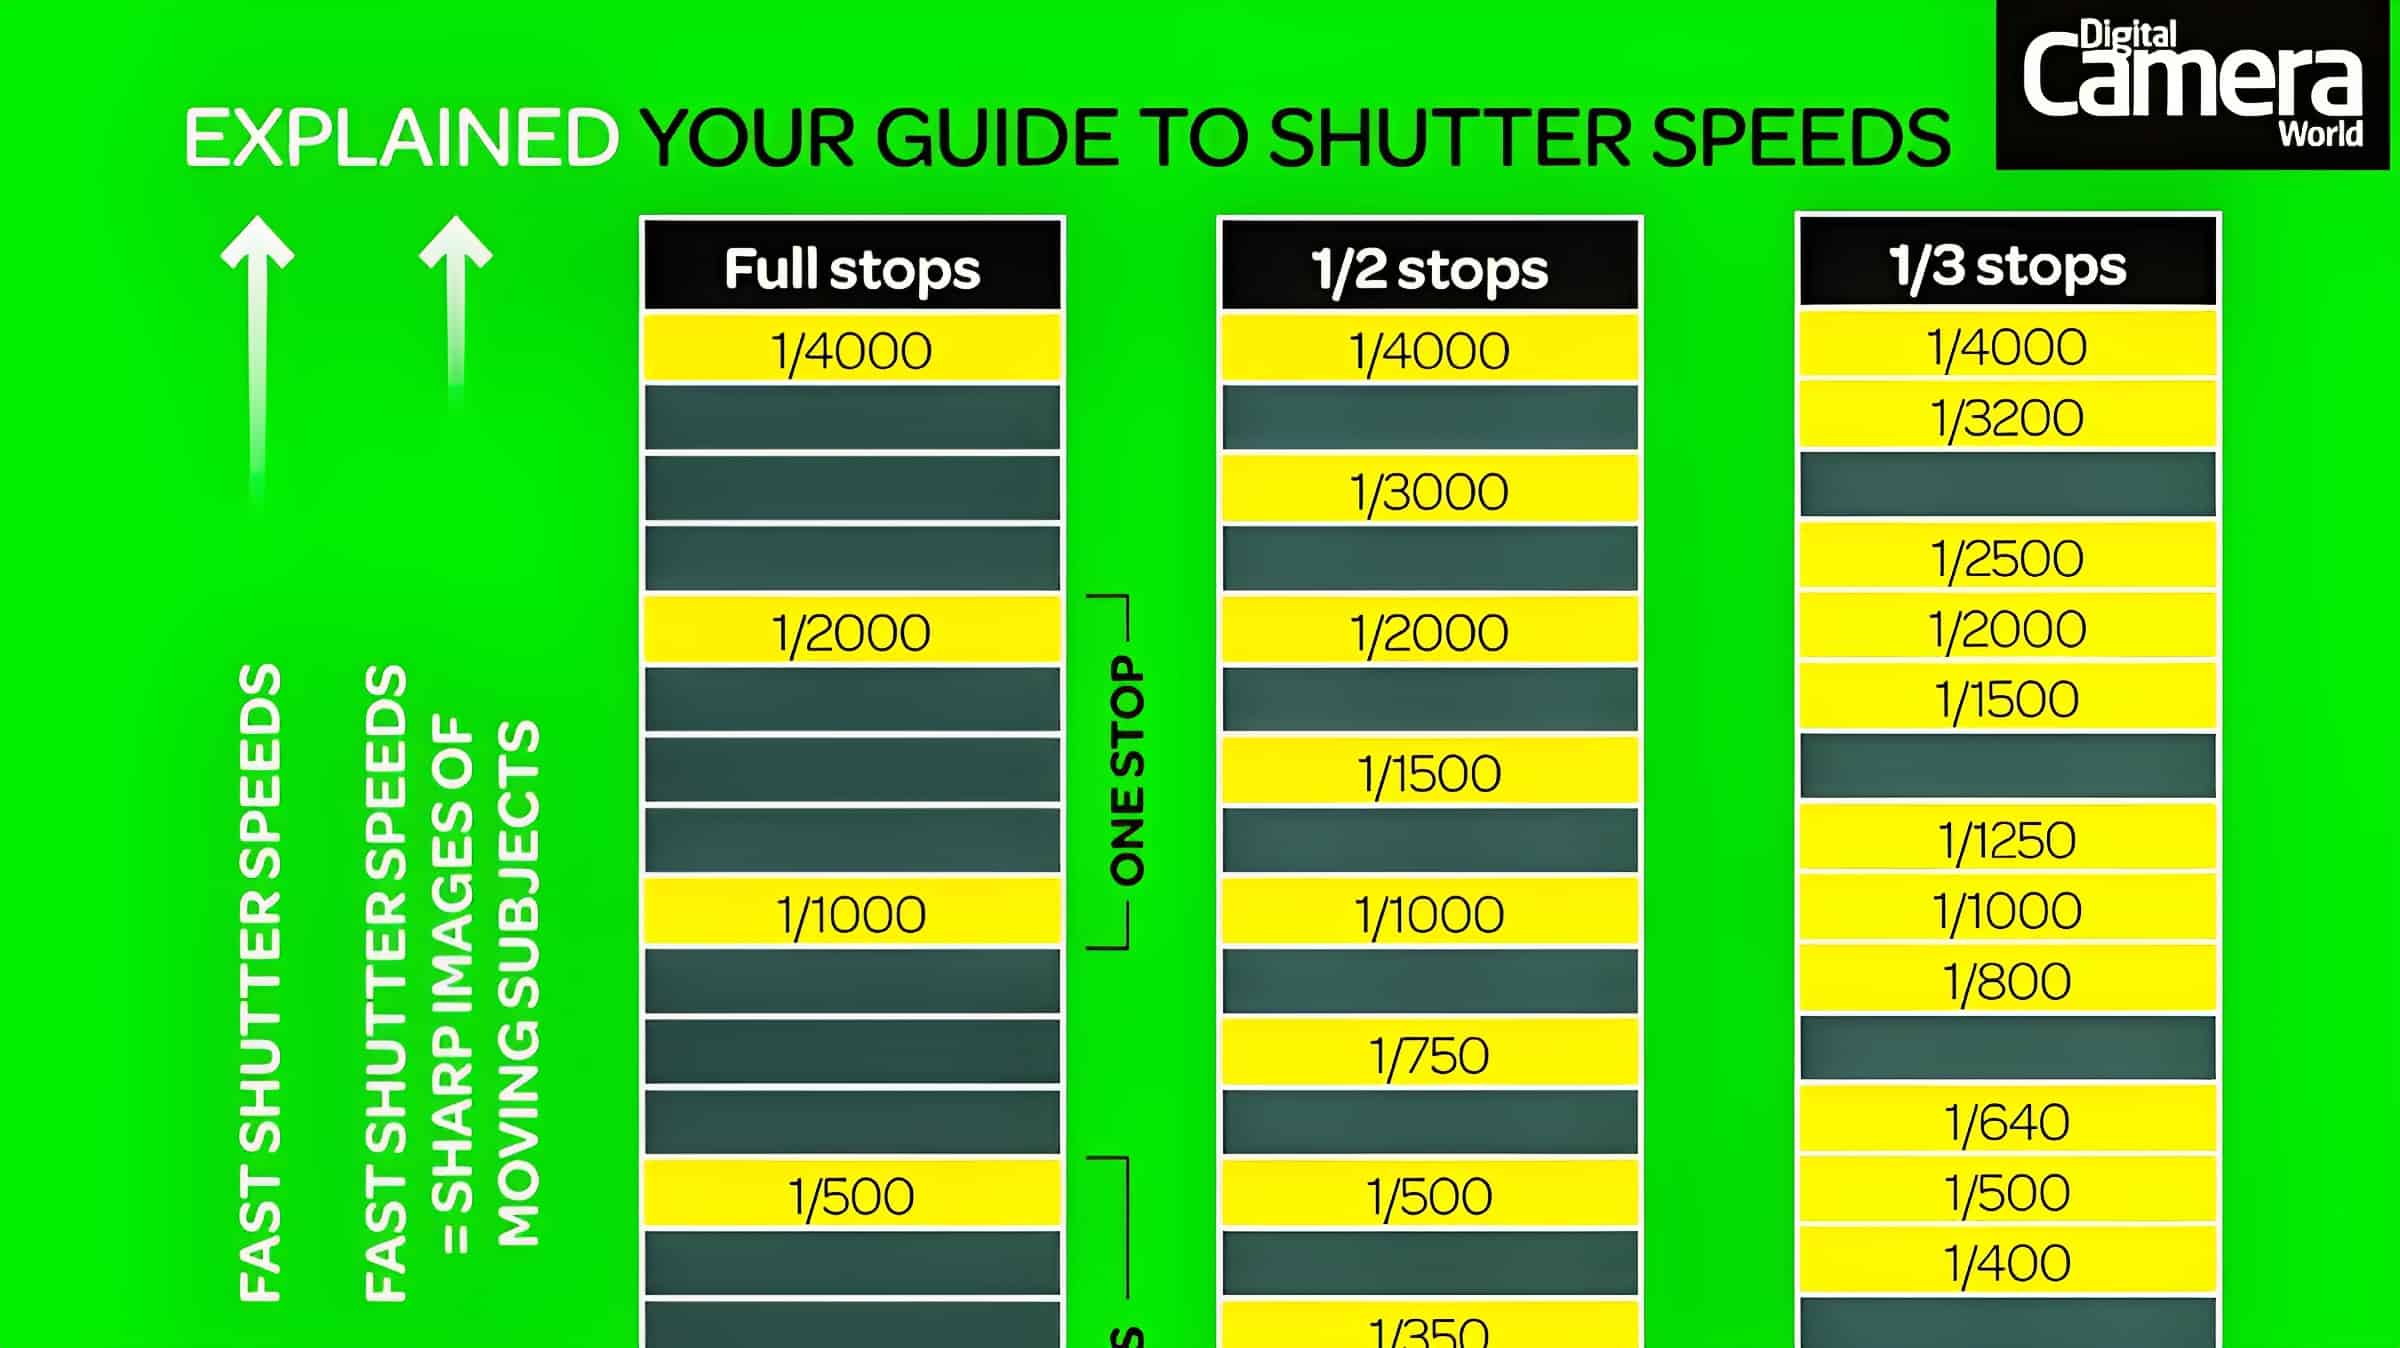
The shutter speed chart categorizes the various shutter speeds into different ranges, ranging from ultra-fast to ultra-slow. The fastest shutter speeds, such as 1/2000th of a second or faster, are ideal for freezing fast-moving subjects and capturing crisp details. On the other end of the spectrum, the slowest shutter speeds, like 1/15th of a second or slower, can create stunning long-exposure effects, including light trails or silky-smooth waterfalls.
Choosing the Right Shutter Speed
When selecting the appropriate shutter speed from the chart, consider the specific shooting conditions and the desired outcome. For example, if you are photographing a fast-paced sports event, you might opt for a faster shutter speed to capture action without motion blur. Alternatively, if you are photographing a landscape in low-light conditions, you might choose a slower shutter speed to allow more light to reach the sensor and create a dreamy effect with soft water motion or streaking clouds.
Furthermore, the shutter speed chart not only helps you freeze or blur motion, but it also plays a crucial role in controlling exposure. In bright daylight, using a fast shutter speed can help prevent overexposure by limiting the amount of light that enters the camera. Conversely, in low-light situations, a slower shutter speed can compensate for the lack of light, allowing you to capture well-exposed images without having to increase the ISO or open up the aperture too much.
Moreover, the shutter speed chart serves as a guide for photographers to experiment with creative techniques. For instance, by using a slow shutter speed and panning technique, you can create dynamic images with a sharp subject against a blurred background, conveying a sense of speed and movement. Alternatively, a fast shutter speed combined with a burst mode can capture a series of images in rapid succession, enabling you to choose the perfect moment from a sequence of action-packed shots.
Practical Tips for Using Shutter Speed Effectively

Now that you have a good understanding of shutter speed and how to interpret the shutter speed chart, let’s explore some practical tips to help you utilize shutter speed effectively in your photography endeavors.
When it comes to photography, shutter speed is not just a technical aspect, but also a creative tool that can enhance your images. Understanding how different shutter speeds can impact your photos will open up a world of possibilities. For instance, a fast shutter speed is commonly used in sports and wildlife photography to freeze action and capture fleeting moments with sharpness. Imagine capturing a bird in mid-flight with every feather perfectly defined, or a soccer player mid-kick, frozen in time. On the other hand, a slow shutter speed is frequently employed in landscape or night photography to create mesmerizing effects like star trails or light painting. By using a slow shutter speed, you can transform a waterfall into a silky flow of water or capture the movement of car lights at night, creating beautiful light trails. Experimenting with different shutter speeds in different genres will widen your creative possibilities and enable you to capture unique images.
Troubleshooting Common Shutter Speed Issues
Despite your best efforts, you may encounter some issues when utilizing shutter speed in your photography. One common problem is camera shake, which can occur when you use a slow shutter speed without proper stabilization. To avoid this, utilize a tripod or increase the ISO to enable a faster shutter speed. Another issue is overexposure or underexposure. If your images appear too bright or too dark, adjust the shutter speed accordingly and refer to the shutter speed chart as a guide to achieving proper exposure.
Additionally, it’s important to consider the subject you are photographing when selecting the appropriate shutter speed. For example, if you are capturing a moving subject, such as a running athlete or a speeding car, you may need to use a faster shutter speed to freeze the action and avoid motion blur. On the other hand, if you want to convey a sense of motion, such as a flowing river or a moving crowd, using a slower shutter speed can help you achieve that desired effect.
Furthermore, it’s worth mentioning that the available light in your environment can greatly influence the shutter speed you choose. In bright daylight, you may need to use a faster shutter speed to prevent overexposure, while in low-light situations, a slower shutter speed may be necessary to allow enough light to reach the camera sensor. Understanding how light interacts with your camera settings will help you make informed decisions when it comes to selecting the ideal shutter speed for your photographs.
Advanced Techniques in Shutter Speed Photography
Once you have mastered the basics of shutter speed, you can explore advanced techniques to elevate your photography to the next level.
Mastering Long Exposure Photography
Long exposure photography involves using a slow shutter speed, typically longer than one second, to capture stunning effects like light trails, starry skies, or smooth water surfaces. To master long exposure photography, ensure you have a sturdy tripod and utilize a remote shutter release for maximum stability. Experimentation and patience are key skills when undertaking this technique.
The Art of Panning in Photography
Panning is a technique commonly used in sports or action photography to convey a sense of movement and speed. By following a moving subject with your camera and utilizing a slower shutter speed, you can create a sharp subject against a blurry background, resulting in a dynamic image. To achieve precise panning shots, practice tracking your subject’s movement and adjusting the shutter speed accordingly.
In conclusion, understanding the principles of shutter speed and its impact on exposure and motion is vital for any photographer. By utilizing the comprehensive shutter speed chart provided in this article and experimenting with different settings, you can unleash your creative potential and capture stunning photographs in various shooting conditions. Remember, practice and patience are key to mastering shutter speed, so grab your camera and start exploring the incredible world of photography!
FAQs
Can I Use Shutter Speed to Control Exposure?
Yes, shutter speed is one of the three pillars of exposure, along with aperture and ISO. Faster shutter speeds result in less light hitting the sensor, producing a darker image, while slower speeds allow more light, creating a brighter image.
What is “Bulb” Mode?
Bulb mode allows you to manually control the shutter’s opening and closing for an extended period, beyond what is usually available in manual mode. This is useful for long-exposure photography like astrophotography or capturing fireworks.
What Equipment Do I Need for Slow Shutter Speed Photography?
For slow shutter speed photography, a sturdy tripod is essential to avoid camera shake. In some cases, you may also benefit from using a neutral density (ND) filter to control the amount of light entering the lens.
Can I Achieve Motion Blur and Freeze Action in the Same Shot?
It’s challenging to achieve both effects in a single shot without post-processing. However, techniques like panning can create a sense of motion in the background while keeping the subject relatively sharp, offering a blend of both effects.
Why Are My Photos Blurry at Slow Shutter Speeds?
Photos taken at slow shutter speeds are susceptible to blur from camera shake or subject movement. Using a tripod and remote shutter release can minimize camera shake, while selecting an appropriate shutter speed can reduce motion blur.
How Does Shutter Speed Affect Depth of Field?
Strictly speaking, shutter speed itself does not affect depth of field; that is primarily controlled by the aperture setting and the distance between the camera and the subject. However, shutter speed can indirectly influence your depth of field if you adjust the aperture to compensate for a change in shutter speed while keeping the exposure constant.
What is Shutter Angle, and How is it Different from Shutter Speed?
Shutter angle is a concept primarily used in cinematography that describes how long the film or sensor is exposed to light during each frame. While shutter speed is usually given in fractions of a second, the shutter angle is described in degrees. Although different, both serve the same fundamental purpose: to control the amount of light hitting the sensor or film.
Can I Create Bokeh Effects with Shutter Speed?
Bokeh, the aesthetic quality of the out-of-focus areas in an image, is primarily influenced by the aperture, not the shutter speed. A wide aperture (small f-number) will produce a shallower depth of field and more pronounced bokeh. However, you may need to adjust your shutter speed to maintain proper exposure when you change your aperture.
How Do I Use Shutter Speed for Astrophotography?
For astrophotography, you generally want to use a slower shutter speed to capture as much light as possible. However, too slow a shutter speed will result in star trails due to the Earth’s rotation. The “500 Rule” is often used as a guideline: divide 500 by the focal length of your lens to get the longest exposure time before star trails become apparent.
Is a Shutter Speed Chart Still Relevant With Modern Cameras That Have Image Stabilization?
While image stabilization can allow for slower hand-held shutter speeds without blur, a shutter speed chart is still relevant. Image stabilization can’t freeze subject motion, and it has its limitations in extremely low-light conditions.
What is Rolling Shutter and How Does Shutter Speed Affect It?
Rolling shutter is a type of distortion that occurs when the camera sensor scans the image sequentially rather than capturing it all at once. Faster shutter speeds can exacerbate the distortion in fast-moving subjects or when the camera is panning quickly. It’s most often a concern in video capture rather than still photography.








![Free Printable F-Stop Chart [Photography CheatSheet] 1 F Stop Chart](https://www.typecalendar.com/wp-content/uploads/2023/09/F-Stop-Chart-150x150.jpg)
![Free Printable Speed Limit Sign Templates [PDF, PNG] 10, 15, 25, 35, 55 MPH, KM 2 Speed Limit Signs](https://www.typecalendar.com/wp-content/uploads/2023/09/Speed-Limit-Signs-150x150.jpg 150w, https://www.typecalendar.com/wp-content/uploads/2023/09/Speed-Limit-Signs-1200x1200.jpg 1200w)
![Free Printable Pie Chart Templates [Excel, PDF, Word] Maker 3 Pie Chart](https://www.typecalendar.com/wp-content/uploads/2023/06/Pie-Chart-150x150.jpg 150w, https://www.typecalendar.com/wp-content/uploads/2023/06/Pie-Chart-1200x1200.jpg 1200w)
