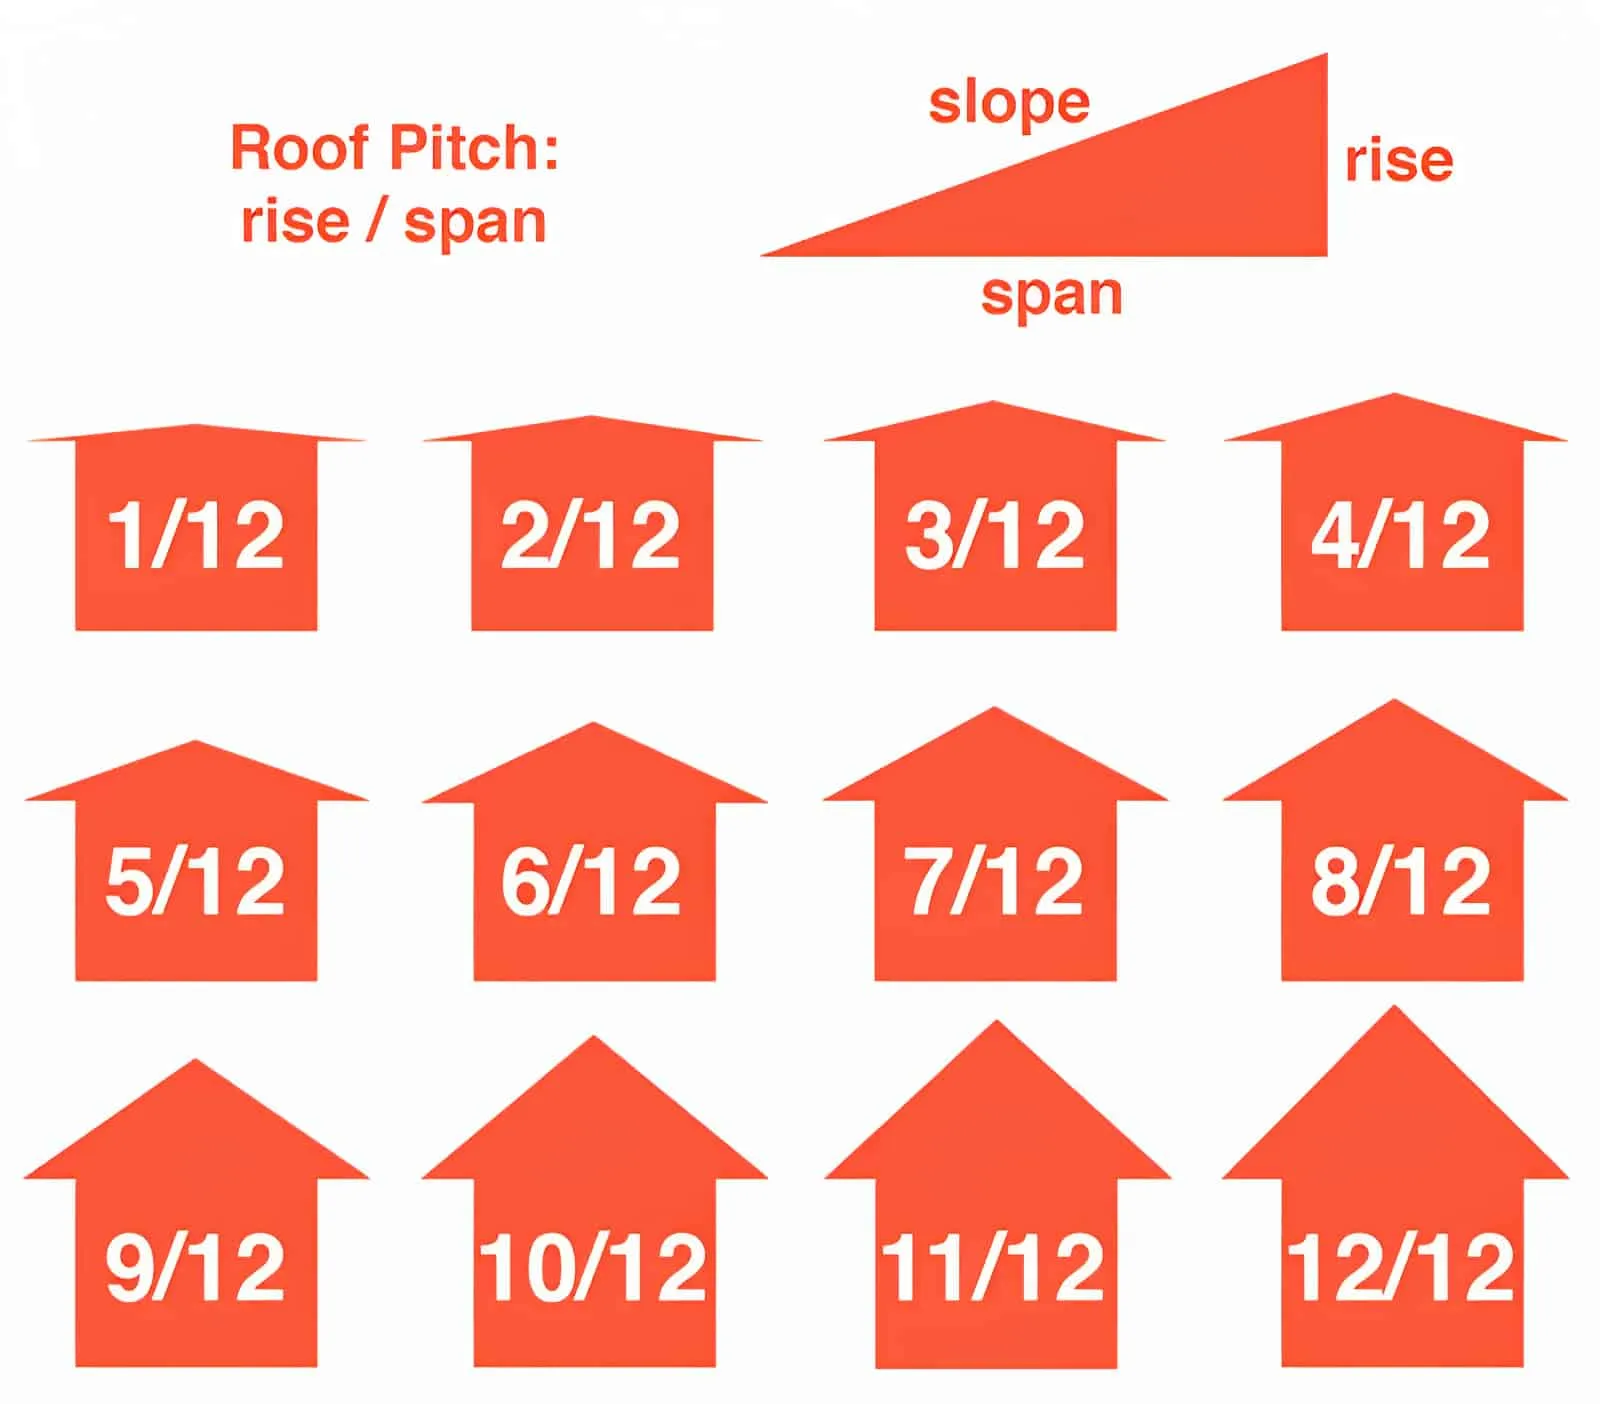
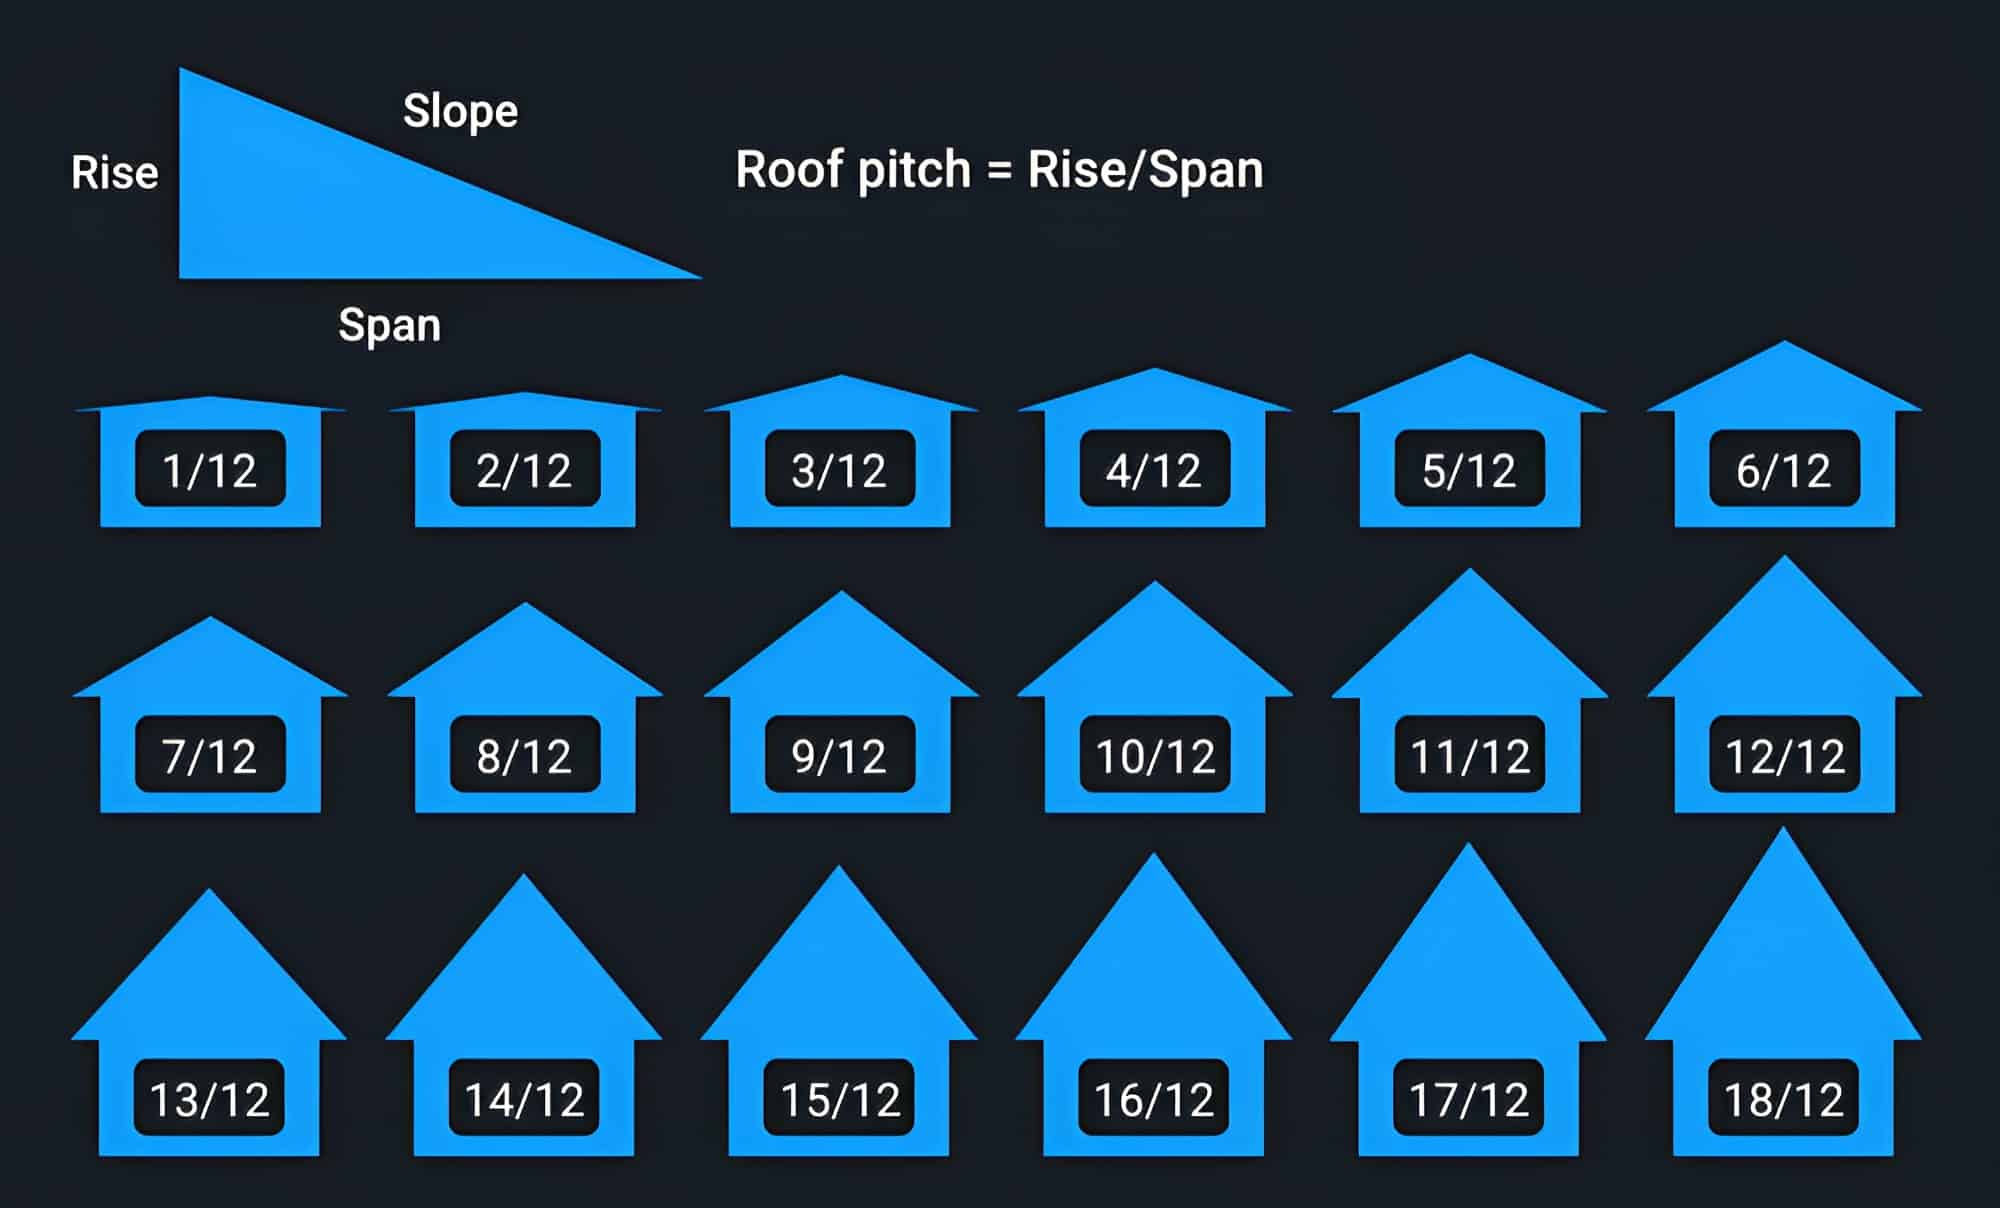
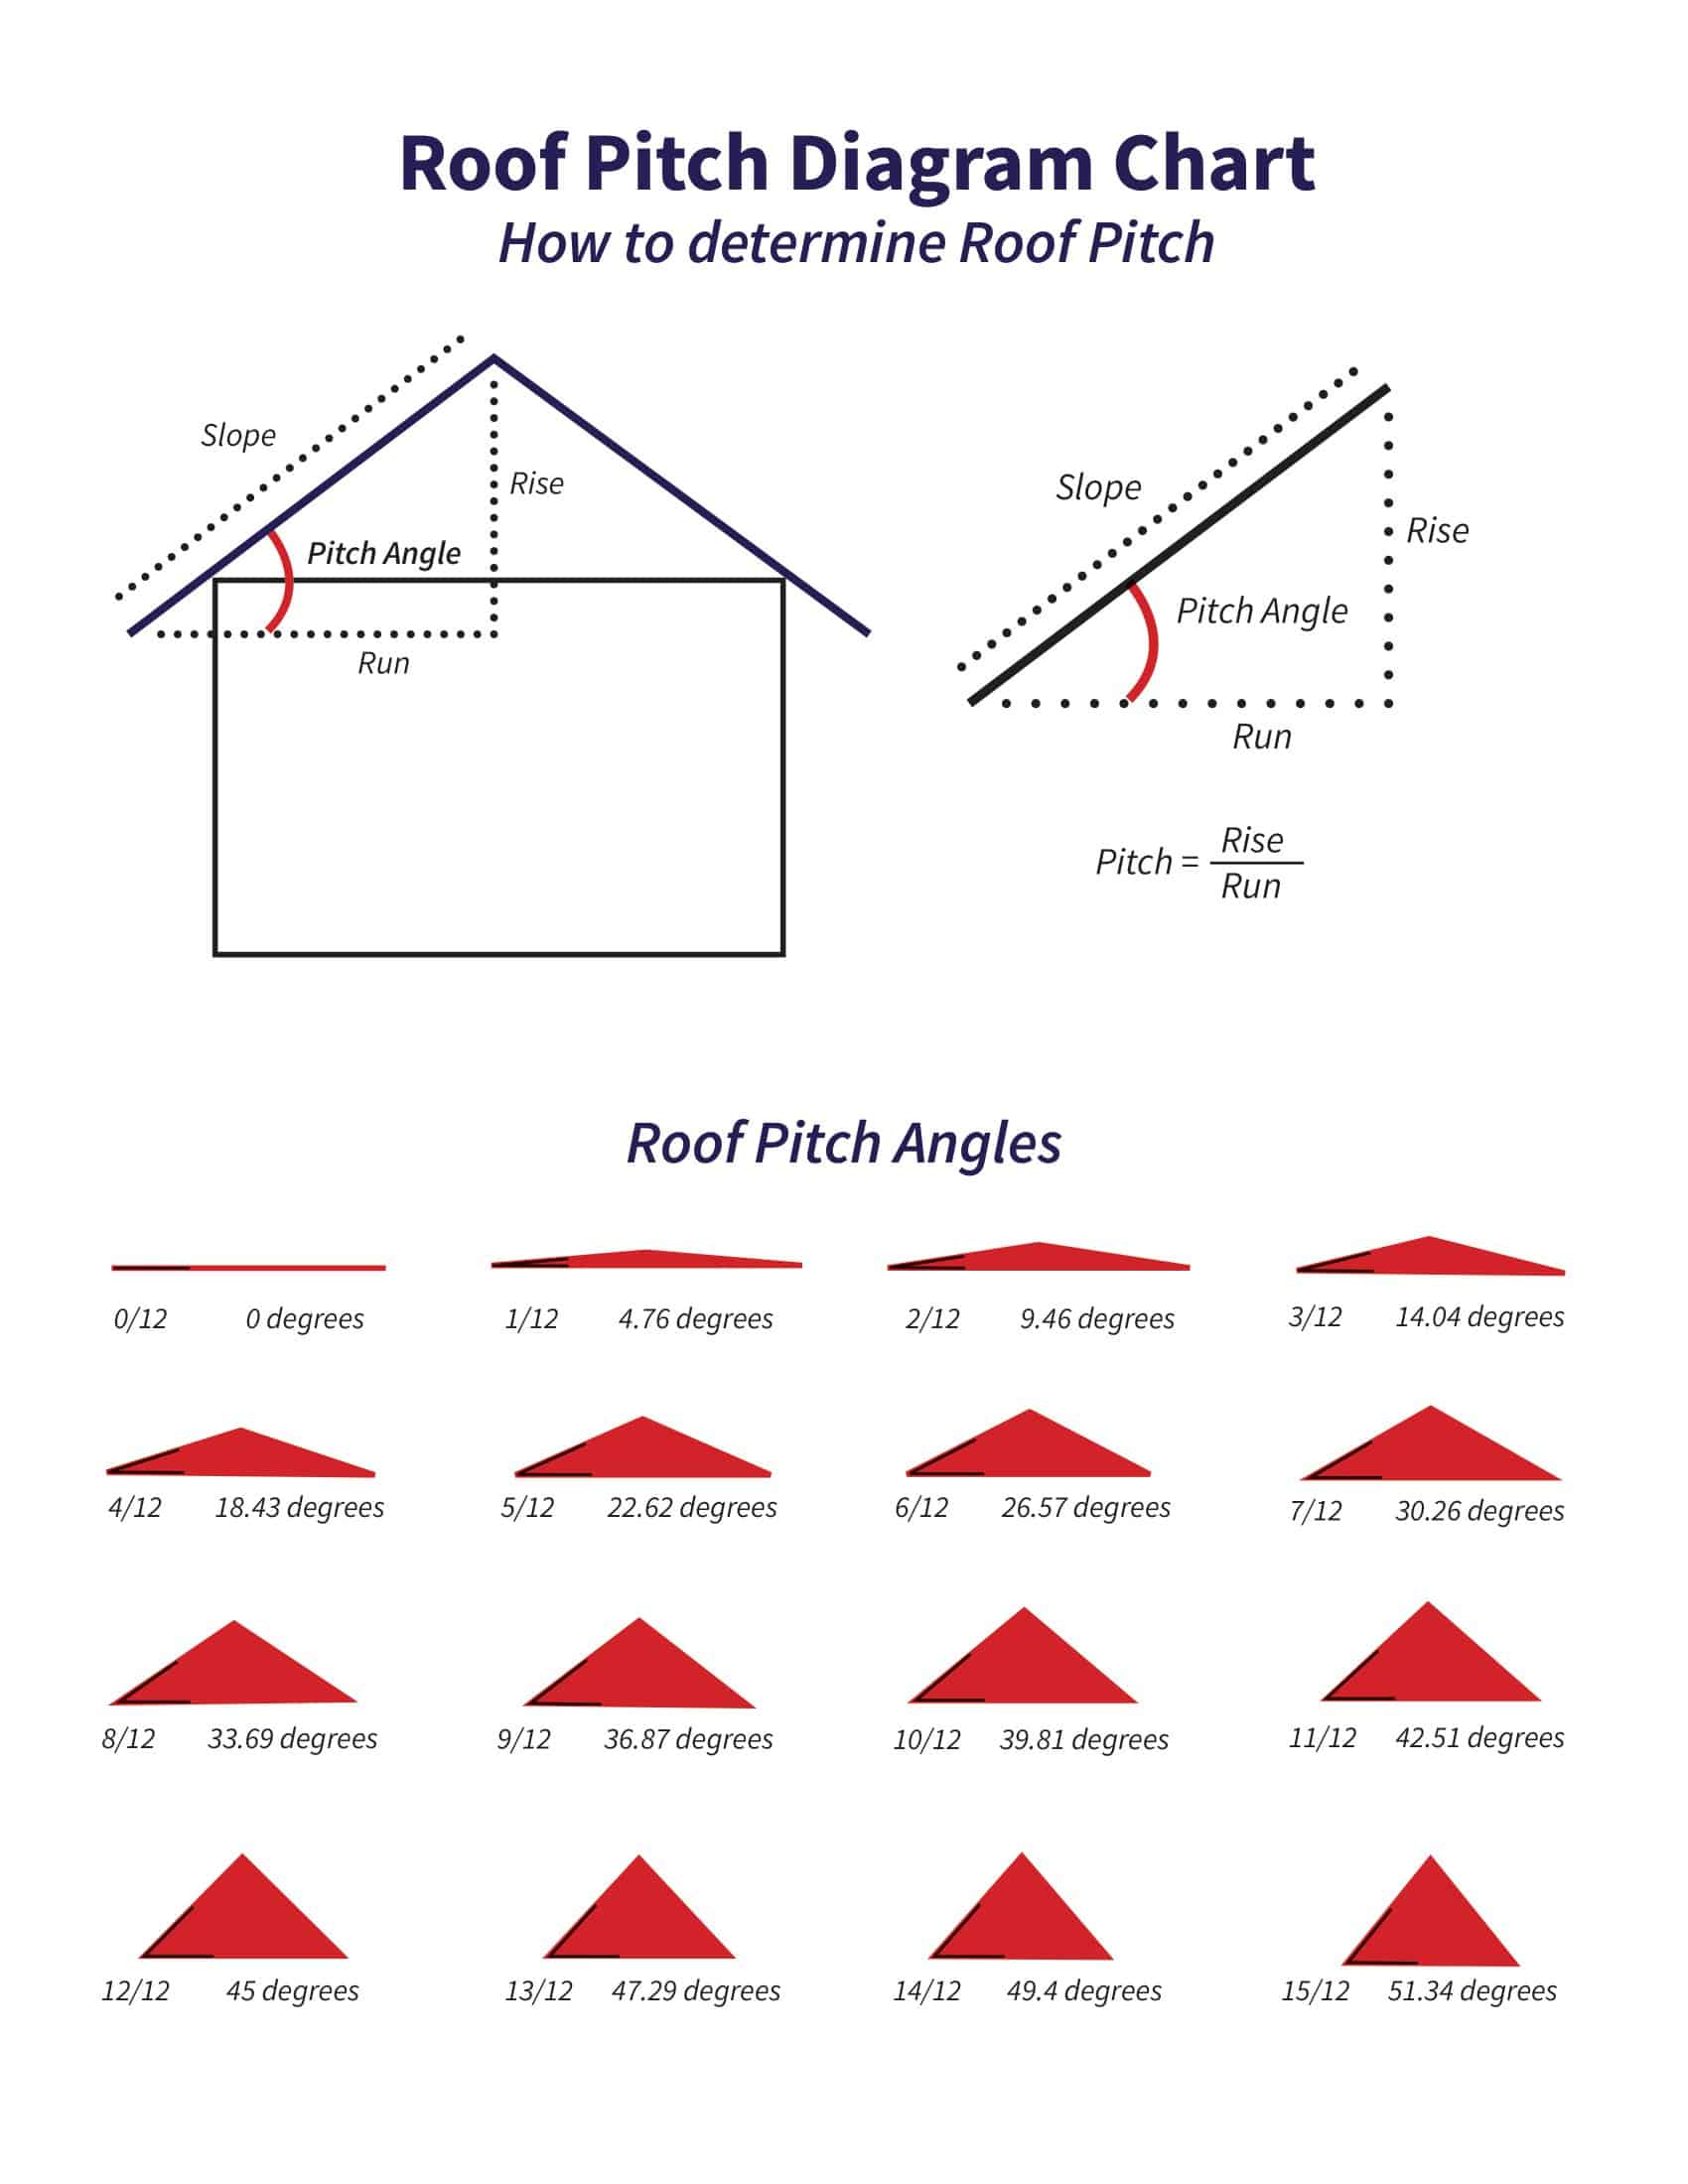
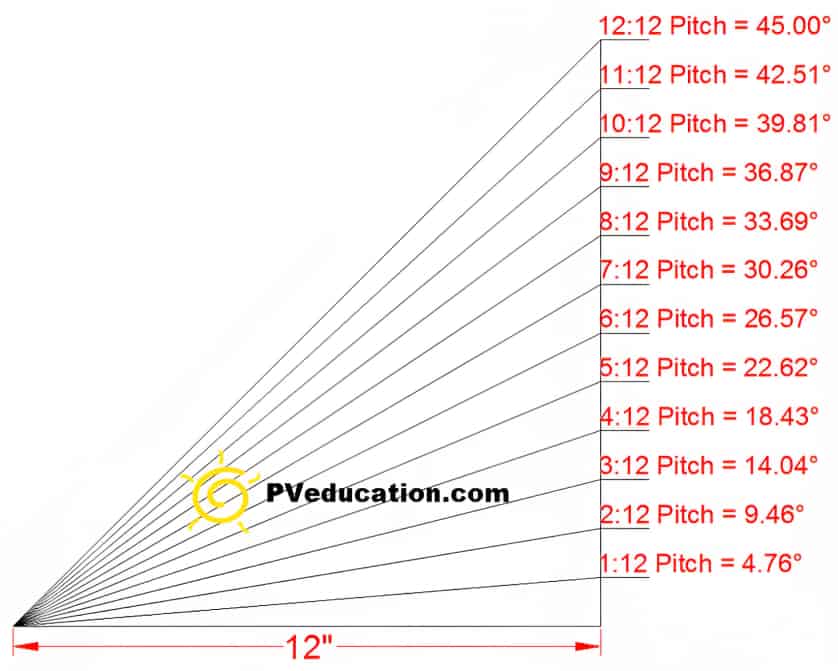
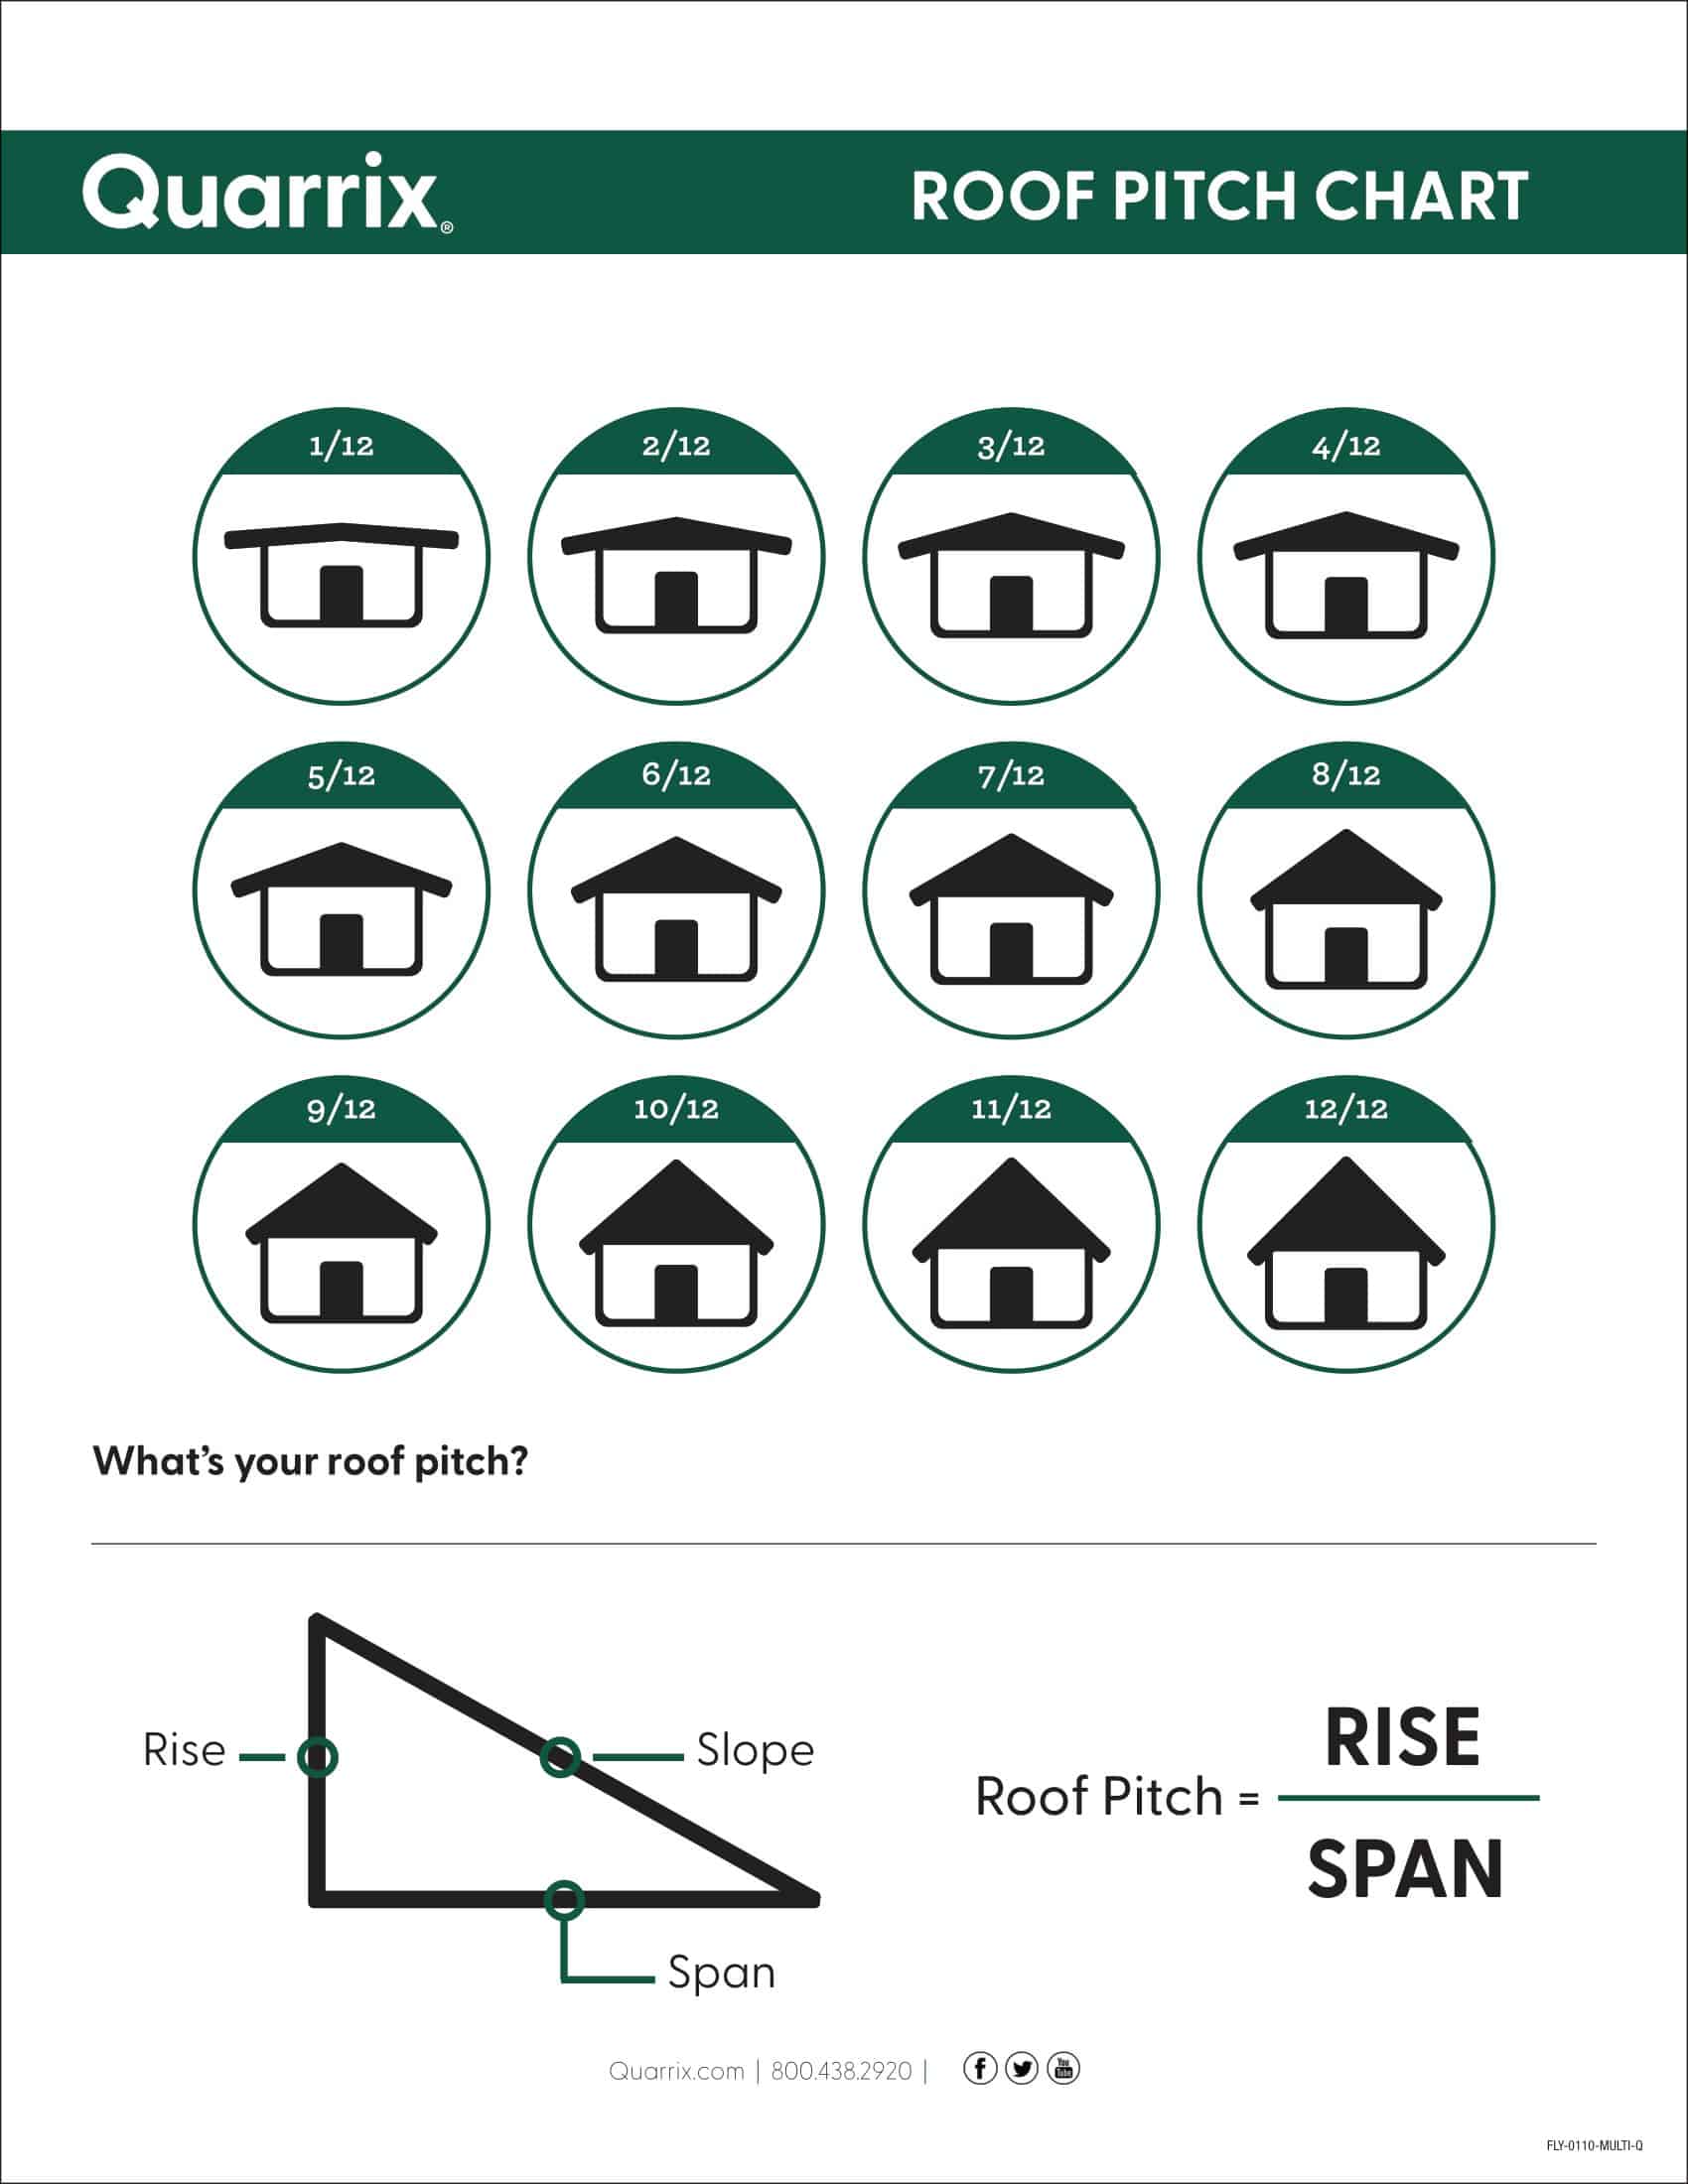
Selecting the right roof pitch is an important decision when designing or replacing a roof. The pitch impacts how quickly water sheds, the cost of materials, and even the architectural style. But understanding the intricacies of roof slope can be confusing with ratios, angles, rises and runs. This is where having a roof pitch chart is invaluable. A roof pitch chart clearly displays the relationships between pitch, angle, rise, and run in an easy-to-read format.
With a roof pitch chart, you can quickly look up the pitch you need based on parameters like desired angle or run. In this article, we’ll examine what roof pitch is, how to read roof pitch charts, common ratios used, and factors to consider when choosing pitch. We’ve also included a downloadable PDF roof pitch chart you can use as a handy reference. Let’s explore the basics of roof slope and how roof pitch charts can help take the guesswork out of working with rise, run, and angles.
Table of Contents
What is a Roof Pitch?

A roof pitch refers to the slope or incline of a roof, typically described in terms of the ratio between the vertical rise and the horizontal run over a specified horizontal distance, often represented as “X:Y”. For example, a pitch of 4:12 means that for every 12 horizontal inches (the run), the roof rises 4 vertical inches (the rise). This measure is crucial in determining how well water and snow will drain off a roof, the type and amount of roofing material required, and the overall aesthetic and architectural style of a building.
Printable Roof Pitch Chart
A Roof Pitch Chart PDF is an essential reference tool for architects, contractors, and builders when designing and constructing sloped roofs. Having a Roof Pitch Chart PDF available provides quick access to visualize roof slope ratios, calculate layout dimensions, and determine appropriate materials. The chart simplifies pitch-related decision making.
The Roof Pitch Chart PDF displays common slope ratios like 4:12, 6:12, 8:12, etc. along with rise-run equivalencies, percentage conversions, and rafter angles. Additional sections show how to calculate the roof area, board feet of decking, and linear feet of hip and valley rafters based on plan dimensions. With all key roof slope data compiled in one place, the Roof Pitch Chart PDF saves time during planning and construction.
A Roof Pitch Chart PDF delivers the critical information needed to accurately and efficiently build pitched roofs. By condensing slope ratios, geometry, and material requirements onto a single page, the chart simplifies comprehension of steepness variables. Having the Roof Pitch Chart PDF handy during layout and framing ensures correct slopes are implemented according to code and visually pleasing design. The chart is an indispensable roofing job site resource.
What is a Roof Pitch Chart?
A roof pitch chart is a visual guide that shows the relationship between the slope or pitch of a roof and the rise and run measurements. The slope of a roof is typically measured in inches of rise per foot of run. For example, a 4/12 pitch roof rises 4 inches vertically for every 12 inches of horizontal run. The pitch is expressed as a ratio of rise to run. Roof pitch charts allow builders and roofing professionals to quickly determine the slope of a roof based on rise and run measurements. The charts also provide recommended roofing materials and installation methods based on the pitch. Roof pitch is an important factor in roof design and performance.
Importance of Roof Pitches
Roof pitches, or the incline and decline of a roof, play a pivotal role in both the aesthetic and functional aspects of a building. Their importance cannot be understated, and here’s why:
Architectural Significance: At the most immediate level, the pitch of a roof influences the overall look and architectural style of a building. Steep roofs might evoke images of traditional European homes, Tudor-style residences, or snowy mountain lodges. On the other hand, flat or low-pitched roofs are often associated with modern, contemporary designs, or structures in arid regions. The pitch can drastically alter a home’s silhouette, affecting its curb appeal and value.
Water Drainage and Snow Load: One of the most critical functional aspects of roof pitches is ensuring effective water drainage. In regions with heavy rainfall, a steeper pitch helps prevent water accumulation by facilitating quicker runoff. This minimizes the risks of leaks, structural damages, or mold growth. Similarly, in snowy areas, a steeper pitch helps reduce the weight burden on the roof by allowing snow to slide off, thus preventing potential roof collapses or ice dam formations.
Climate Consideration and Insulation: The pitch of the roof can influence the building’s insulation and ventilation. Steep roofs typically mean larger attic spaces. Such spaces can be designed to promote airflow, which can help regulate temperatures within the house, keeping it cooler in the summer and warmer in the winter. This not only contributes to the comfort of the inhabitants but also can lead to energy savings. In hot and dry climates, a flatter roof might be preferable as it limits the volume of the interior space that needs cooling.
Material Compatibility: The choice of roofing material often depends on the roof’s pitch. For instance, asphalt shingles might be ideal for medium to steeply pitched roofs, but they wouldn’t be suitable for flat roofs that don’t shed water as effectively. Conversely, roofing materials like rubber membranes, often used for flat roofs, wouldn’t be appropriate for steeper inclines. The pitch, therefore, ensures that the right materials are used, leading to longer roof lifespans and reduced maintenance costs.
Understanding Roof Pitches
Roof pitches play a fundamental role in the design, functionality, and aesthetics of buildings. Whether you’re a homeowner considering a roofing project or a professional in the construction industry, grasping the concept of roof pitches can be incredibly beneficial. Here’s a detailed guide to understanding roof pitches.
Basics of Measurement
- Rise and Run: At the core of understanding roof pitches is the concept of “rise” and “run”. The “rise” is the vertical height of the roof, and the “run” is the horizontal distance over which that height is spread. Typically, the run is measured over a standardized distance, such as 12 inches.
- Pitch Ratio: Roof pitch is generally expressed as a ratio, with the rise stated first and the run stated second. For example, a 4:12 pitch indicates that for every 12 horizontal inches (the run), the roof rises by 4 vertical inches.
- Tools for Measurement: While there are specific tools like pitch gauges to help determine a roof’s pitch, many professionals also use levels and tape measures. For example, one can measure a 12-inch run horizontally, then measure the rise vertically from the end point to the roof to determine the pitch.
Pitch vs. Slope: Is There a Difference?
- Defining Terms:
- Pitch: This primarily pertains to the steepness or incline of a roof, typically expressed as a ratio, as previously described.
- Slope: Slope refers to the incline of a roof surface and is determined by the vertical rise in inches for every horizontal twelve inch (12″) run. So, a roof with a rise of 4 inches for every 12 inches of run has a 4-in-12 slope.
- Overlap and Distinction:
- Overlap: At first glance, pitch and slope may seem synonymous, given that both relate to the steepness of a roof. In many contexts, especially in informal settings, they are used interchangeably.
- Distinction: Technically, slope describes the incline across a given distance, often presented as a percentage (like a road’s gradient), while pitch typically implies the ratio used in the roofing industry to convey steepness.
- Practical Implications: Understanding the difference becomes crucial when you’re involved in tasks like water drainage planning or insulation. A roof’s slope will influence how water drains, the speed at which snow might slide off, and even how wind interacts with a building’s surface.
Types of Roof Pitches
Roof pitch refers to the steepness or incline of a roof. Understanding the different types of roof pitches can help homeowners make informed decisions about the right roofing style for their needs, aesthetic preferences, and environmental conditions. Here’s a guide to some of the most common types of roof pitches:
Flat Roofs
Contrary to their name, flat roofs aren’t perfectly flat. They have a very slight pitch, typically ranging from 1/4:12 to 1/2:12, meaning for every 12 horizontal inches, the roof might rise anywhere from 1/4 to 1/2 inch. This slight pitch helps with water drainage. Flat roofs are common in modern and commercial architecture due to their sleek appearance. They provide extra space for HVAC equipment or even rooftop gardens. One challenge with flat roofs is water pooling, which can lead to leaks if the roof is not properly maintained.
Low Slope Roofs
Low slope roofs have a pitch that ranges from 1:12 to 3:12. These roofs are relatively flat but have a more noticeable incline than flat roofs. They are often used in commercial buildings, but they can also be seen in residential designs, especially in contemporary homes. Low slope roofs offer the advantages of a flat roof, like providing space for equipment, while reducing the risk of water pooling. Proper underlayment and waterproofing techniques are essential for these types of roofs to prevent leaks.
Medium Slope Roofs
With a pitch range of 4:12 to 9:12, medium slope roofs are what many people might envision as a “normal” pitched roof. This style is prevalent in residential construction across various architectural designs. The balanced incline of medium slope roofs effectively diverts water, reducing the risk of leaks and water damage. These roofs also offer more attic space than flatter designs, allowing for potential storage or additional living space. Moreover, they can support a variety of roofing materials, from asphalt shingles to clay tiles.
Steep Slope Roofs
Any roof with a pitch of 9:12 or greater falls into the steep slope category. These roofs are dramatic and eye-catching, often seen in specialized architectural styles like Gothic, Tudor, or A-frame houses. Steep roofs are excellent for shedding snow and water quickly. However, their construction and maintenance can be more challenging due to the steep incline. Safety equipment is a must when working on these roofs.
Additional Varieties
Beyond the common categories mentioned, there are unique and specialized roof pitches tailored to specific needs and aesthetic preferences. Mansard roofs, for instance, have a double slope, with the lower slope being much steeper than the upper one. Gambrel roofs resemble barn roofs and also have two distinct slopes, but the design differs from mansard roofs. Saltbox roofs, seen in some colonial-style homes, have an asymmetrical design with one side being more extended and steeply sloped than the other.
How to Read a Roof Pitch Chart
Reading a roof pitch chart can be quite straightforward once you understand the terminology and the basic concepts behind it. Roof pitch is typically defined as the rise over a 12-inch run. In simpler terms, it means for every 12 inches (or one foot) horizontally, how much does the roof rise vertically?
Here’s a detailed guide on how to read a roof pitch chart and an overview of standard roof pitch angles:
Understanding the Ratio
Roof pitch is usually represented as a ratio, for example, 4:12. In this example, the roof rises 4 inches for every 12 inches of horizontal distance (run). The first number (rise) represents the vertical measurement, while the second number (run) always remains consistent at 12 inches.
Standard Roof Pitch Angles
Roof pitch can also be expressed in degrees. Here are some standard roof pitch angles alongside their respective ratios:
- Flat Roof: 1/4:12 to 1/2:12 (around 1ยฐ to 2ยฐ)
- Low Slope Roof: 1:12 to 3:12 (around 4.8ยฐ to 14ยฐ)
- Medium Slope Roof: 4:12 to 9:12 (around 18.4ยฐ to 37ยฐ)
- Steep Slope Roof: 9:12 and above (37ยฐ and above)
Reading a Roof Pitch Chart
- Locate the Pitch Ratio: On most charts, the pitch ratios will be listed down one side of the chart, often starting with flatter pitches at the top and increasing as you go down.
- Find the Corresponding Degree: Opposite the pitch ratio, you’ll typically find the angle in degrees. This angle represents the steepness of the roof.
- Interpreting Additional Data: Some roof pitch charts might provide additional information, such as the suitable type of roofing material for that pitch or the recommended underlayment. Always check any accompanying legends or notes to fully understand the chart.
- Use of Tools: Some pitch charts are interactive, especially online versions. They might allow you to input specific measurements, like the rise and run, and then the tool calculates and displays the corresponding roof pitch angle.
- Understanding Roof Types: Recognize the type of roof based on the pitch. As mentioned in the standard roof pitch angles, you can categorize the roof as flat, low slope, medium slope, or steep slope based on the given ratio or angle.
Practical Application
If you’re planning to install or replace a roof, understanding how to read a roof pitch chart is crucial for a few reasons:
- Material Selection: Some roofing materials are better suited for specific pitches. For example, asphalt shingles work well for medium to steep pitches, while rubber membranes are more suitable for flat roofs.
- Water Drainage: Ensuring that you choose the right pitch for your region’s climate and precipitation levels is key to maximizing the lifespan of your roof.
- Aesthetic and Design Choices: The roof’s pitch can greatly influence the architectural style of a house, so it’s essential to consider this when designing or renovating a home.
Calculating Roof Pitch
Calculating roof pitch is an essential aspect of understanding the incline and design of a roof. Hereโs a comprehensive guide on how to do so:
Tools Needed:
- Ladder: To safely access the roof.
- Level: Preferably a carpenter’s level that’s at least 2 feet long.
- Tape Measure: To measure the distance on the level and the rise of the roof.
- Pencil and Notepad: To jot down measurements.
- Calculator: For calculations, if required.
- Safety Gear: This includes non-slip shoes, safety harness, gloves, and safety glasses.
Step-by-Step Guide:
Step 1: Safety First
Always ensure you’re using a sturdy ladder on even ground. It’s advisable to have someone with you to hold the ladder steady. Wear your safety gear, including non-slip shoes, to prevent any mishaps.
Step 2: Access the Roof
Climb the ladder until you’re close to the roof’s surface. You don’t need to go to the peak; anywhere on the roof slope will suffice.
Step 3: Place the Level
Hold the level horizontally (flat) onto the roof. Ensure it’s perfectly level by checking the bubble in the middle of the liquid vial.
Step 4: Mark the 12-inch Point
From one end of the level, measure out 12 inches (a foot) towards the other end and mark that point with your pencil.
Step 5: Measure the Rise
While keeping the level flat and horizontal on the roof, use the tape measure to measure the vertical distance (rise) from the roof surface up to the bottom of the level at your 12-inch mark. This measurement tells you how much the roof rises for every 12 inches it runs horizontally.
Step 6: Record the Pitch
Jot down the measurement you’ve taken on your notepad. Your roof pitch will be the rise over a 12-inch run. For instance, if the rise is 6 inches, your roof pitch is 6:12.
Step 7: Repeat
For accuracy, you might want to take measurements at a couple of different points on your roof and then average them out.
Step 8: Calculate Degree (Optional)
If you wish to convert the pitch into a degree angle, you can use a calculator or a roof pitch chart. There are also online tools available where you input the rise and run to get the angle in degrees.
Step 9: Safety Descent
Once you’ve completed your measurements, carefully climb down the ladder. Ensure you have your tools and notepad securely held or pocketed, so you have both hands free to grip the ladder.
Step 10: Store Your Tools
Once safely on the ground, gather all your tools, and store them properly. Remember to erase any pencil marks from the level.
For example:
If the roof rises 4 inches for every 12 inches of run, the pitch ratio is 4/12.
The formula is:
- Roof Pitch = Rise (in inches) / Run (in feet)
- So for a 4/12 pitch roof with a 12 foot run, the calculation would be:
- Pitch = Rise / Run = 4 inches / 12 feet = 4/12
The result is usually simplified to state the pitch as just the first number – 4. So a 4/12 pitch would be referred to simply as a “4 pitch” roof.
Knowing the roof pitch ratio allows you to calculate the amount of rise needed for a certain run to achieve a desired slope. This formula is useful for roof framing and design. Steeper pitches require more material and cost but may be preferred in snowy climates. Standard roof pitches range from 3/12 to 12/12.
How to Determine Roof Pitch
Determining the appropriate roof pitch for a building involves a blend of functional reasoning, aesthetic preferences, and material considerations. Here’s a comprehensive look into how one might determine the most suitable roof pitch:
Measuring Existing Roof Pitch:
- Tools Needed:
- A carpenter’s level (preferably 2 feet long)
- Tape measure
- Pencil and notepad
- Procedure:
- On the roof, place the level horizontally (flat) and ensure it’s perfectly level using the bubble indicator.
- From one end of the level, measure out 12 inches (a foot) towards the other end and mark that point with your pencil.
- While keeping the level flat on the roof, use the tape measure to measure the vertical distance (rise) from the roof surface up to the bottom of the level at your 12-inch mark.
- Note down the measurement. If the rise is, for instance, 6 inches for every 12 inches of run, then your roof pitch is represented as 6:12.
Deciding the Ideal Roof Pitch:
The ideal pitch for a roof is influenced by various factors. Hereโs what to consider:
- Climate and Weather:
- In regions with heavy rainfall or snowfall, a steeper pitch is beneficial as it ensures quick runoff, reducing chances of leaks or snow accumulation.
- In wind-prone areas, a moderate to low pitch might be more suitable as it offers less resistance to gusts.
- Aesthetic and Architectural Style:
- The architectural style you’re aiming for can heavily influence the pitch. Classic styles like Tudor or Colonial often feature steep roofs, whereas contemporary designs might favor flat or low-pitched roofs.
- Material Considerations:
- Different roofing materials are designed for various pitches. Asphalt shingles, for example, are suitable for a wide range of pitches but might not be ideal for very flat roofs. In contrast, materials like rubber membranes are specifically designed for flatter surfaces.
- Structural Considerations:
- The structure of the building can sometimes limit the pitch you can choose. If the building’s framework isn’t designed to handle the weight of a steep roof (especially with heavy roofing materials), you might need to opt for a shallower pitch.
- Additionally, a steeper roof will result in a larger attic space, which could be used for storage, insulation, or even additional living space.
- Budget and Construction Constraints:
- Steeper roofs generally require more materials and can be more labor-intensive to construct, potentially leading to higher costs.
- However, over the lifespan of the building, a roof with the right pitch for the local climate might reduce maintenance costs and prolong the life of roofing materials.
FAQs
What is considered a low pitch roof?
A low pitch roof typically has a pitch of 3:12 or less. This means for every 12 horizontal inches, the roof rises 3 inches or less.
What types of roofing materials are best for a low pitch roof?
For low pitch roofs, it’s best to use roofing materials that offer strong waterproofing capabilities, such as built-up roofing, modified bitumen, or certain single-ply membranes like EPDM, TPO, or PVC.
What is considered a steep pitch roof?
A roof is considered steep if it has a pitch greater than 9:12. Steeper pitches can be as extreme as 18:12 or even 21:12 in certain designs.
Can I change the pitch of my existing roof?
Yes, but altering the pitch of an existing roof is a significant project that can be costly and complex. It usually involves restructuring the roof framing and will likely require a professional architect or builder to ensure it’s done correctly and safely.
How does roof pitch affect the cost of a roofing project?
The steeper the roof, the more challenging it can be to work on. This can lead to increased labor costs. Moreover, steeper roofs may require more materials due to their larger surface area. However, the exact costs can vary based on location, type of roofing material, and other factors.